Threw this together on Thanksgiving. Because it’s true.

Feel free to take and use. (Click for bigger version.)
Threw this together on Thanksgiving. Because it’s true.

Feel free to take and use. (Click for bigger version.)
So, among other productivity methods I’ve been trying this month, I also tried the Hipster PDA method, where essentially you use a small stack of index cards with a big clip to keep track of what you need to get done. (Optionally also with the Getting Things Done and 43 Folders philosophies.)
Most people react to this by saying something like, “Seriously? Index cards.” Yes, seriously. You should probably try it out. And I know several people for whom this PDA works very well!

But I’m not one of them.
Here’s the thing — after literally years trying to get myself to use paper calendars/planners/notebooks/etc., I finally discovered that if my calendar / organizer can’t beep at me, it effectively doesn’t exist.
While trying out the Hipster PDA, I thought I’d finally give it one more shot. See if that was still true. It is.
Sure, I can carefully put everything I want to do today into a planner. I can schedule that appointment for 12:00. And then life will happen, the dean will have a critical project he needs done by tomorrow, I get deep into the zone working on that, and don’t realize until 5:32 pm that we had an appointment at 12:00. That’s pretty much how my life and my brain work.
Furthermore, when you ask me to bring you a document tonight, I’m filing that away in my memory with 32 other things I’m supposed to remember to do by then. 1-17 more are guaranteed to come along before then. Odds are, I’m not bringing your document tonight. Yes, the hPDA is supposed to remind me — if I’m not so absorbed in thinking about the next problem to give it a few minutes. Throughout my test, I only rarely managed to consult my stack of cards effectively. I’m both an easily distract-able and highly focused individual. (Yes, you can be both.)
My solution, the one I’ve been working on for a few years now since I got my first PDA, is to put everything into my digital calendar(s). Events and appointments are obvious, but I also add everything I need to remember later but probably won’t, like “Start walking to class now or you’ll be late”, “Look over the document that Sarah just handed you”, “Respond to Dana’s email”, etc. For things like that, I take my best guess as to when would be a good time to address that matter. 50% of the time I’m wrong, but the reminder brings it back into my consciousness when it would otherwise be lost. Also, it’s easy to tell the reminders to try again later.

I have two calendars: a Google Calendar for more personal and school things, and an Exchange calendar for work-related things. The beauty here is that both calendars live in the cloud — meaning they’re not saved on something I can drop into the sink and destroy forever. And both my phone and computer connect to them, so I’ll always be reminded.
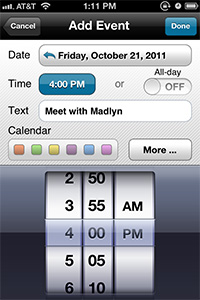
To make things even easier, this month I started using Easy Calendar for the iPhone. I find it much quicker than the default calendar app to add new items, and to see what’s coming up in the next week. Easy Calendar lets you set a default alert for every new item you add, which is good since I add an alert to every single one.
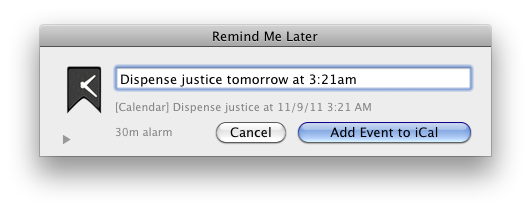
On my computer, I use the aptly named Remind Me Later app (free), which lets me type in natural language, like “Turn in that awesome assignment tonight at 6” The app is smart enough to know that by “tonight” I mean October 25th, and that “6” means 6 p.m., and it automatically puts it into my calendar with a reminder.
 Like I mentioned earlier, sometimes it’s enough only that the system bring an item back into my working memory after it’s been pushed out by any number of a dozen things.
Will this system work for you? Quite possibly. Is it the right one for you? Maybe. Hard to say. Could be that the Hipster PDA works better for you, for example. If my experiments with productivity techniques have done anything (besides give me some great ideas and tools), they’ve reminded me that I’m a cognitive bird of a somewhat different color. But then, aren’t we all in our own ways?
The Actiontec GT784WN is a pretty nice DSL modem/wireless N router. For most of you, it will work right out of the box — even auto-detecting all your settings.
If you’re on Qwest/CenturyLink, not so much. In fact, they’ll try to tell you that the modem isn’t even compatible. That isn’t quite true — it is compatible, it simply isn’t supported, meaning their customer service has no training for this model. And that’s okay!
But you got your Actiontec and you want Internets. Well, we may be able to help you with that! I’m going to repeat some of the normal setup steps here. If you know what you’re doing, skip to #7.
UPDATE: When I originally posted this, it was for the Qwest service area. CenturyLink has merged with a lot of companies since then, and other smaller areas may have different connection settings. So these settings may not apply to you!
Your mileage may vary! And good luck.
(Thanks, commenter Curtis for the regional settings update.)
IF YOU LIVE IN FLORIDA: Commenter Just Joe has supplied the settings for your area. Go to the comment. Thanks, Just Joe.
It’s been a month since I busted out with the Pomodoro Technique in a productivity boosting experiment. While I think it has improved thing somewhat, there are still some areas I find it a little lacking.
A quick overview in the (quite possible) event you haven’t heard of it. Basically, you:
* Not actually part of the Pomodoro Technique
RECORDS
There’s a lot that’s great about the Pomodoro Technique, one of the main things being the record you end up having of your day. It’s easy to get to the end of a typical day and think or feel that you haven’t actually accomplished much. The PT leaves you with a record of what you’ve accomplished so you can feel, well, accomplished. For every Pomodoro you do (or 25-minute activity block) you write it down. Every check feels like giving yourself points for getting something done, even if it’s your 16th check on, say, “Update the Natural History Museum Observation Module.”
For my task list (or “activity inventory”), I use a text file in Dropbox, which I have easy access to on my phone via an app called Plaintext. That way I can keep it handy on any computer I have, or when I’m lacking one. I also sometimes list how many pomodoros I think something is going to take. If you’re like me, having time frames on unpleasant tasks of any magnitude help a lot.


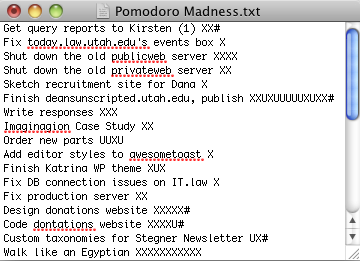
My list. On my laptop (left) and on my phone (right). X means a completed pomodoro, U means I was interrupted or it wasn’t finished, and # means the task is complete.
FOCUS
This is a great aspect. When tempted to deviate to email or IMs, it’s helpful to remember that I’m on the clock here — I can get to that after this pomodoro is done. I have a simple timer in my menubar, so I can easily see how much time is left. While most Pomodoro apps will set you back a few bucks, there are a bunch of free ones. I use Menubar Countdown.
![]()
Menubar Countdown (near the left)
PLANNING
Another great thing about this method is the way it can help you challenge yourself. When starting a day, you can set a goal for yourself to beat your average pomodoros done in a day. That average is also a good indicator of how much you’re likely going to accomplish on a given a day, so you can gauge how much to take on.
Pomodoro isn’t perfect, but then, what is? That said, here are some possible drawbacks.
ALL OR NOTHING
Either you work for 25 minutes and get to mark an X, or you don’t get to complete it. I use a different mark than X, but it doesn’t feel the same. Also, sure you can ignore emails for half-an-hour, but when people drop by in person, you can’t really tell them to come back in 9.5 minutes. You also can’t show up late to meetings or train stops because you’re in the middle of one.
SOMETHING ELSE TO DO
As great as all the things I listed above are, sometimes creating a task list and checking it off is just one more thing to do, and when you already have forty-six-dozen deadlines coming, you don’t really want to have yet another thing to manage. Sure, managing it helps you manage other things, but if that logic always applied, our dentists would never be on our cases about flossing.
Pomodoro is great stuff. Will I keep using it? Probably. But my implementation will likely morph into something else along the way as I adjust it for my own needs. I just can’t see myself managing an activity inventory, a to-do list, a chart sheet and an extended log like the book tells you to. If I’ve learned one thing about both interface design and myself, it’s that things have to be simple, or they won’t be sustainable.
If you use a Mac and Windows together, you’re likely to end up with a bunch of hidden .DS_STORE files all over your Windows drives. You can easily search and destroy them all using this command:
(Open the command line first of course. You can do this by mashing Win + R, then typing “cmd”. Or just type “cmd” in the Start Menu search box.)
del /s /q /f /a .DS_STOREThat will find every instance of this Mac resource file and delete it. Good times. But wait there’s more. In addition to DS_STORE, OSX will also put a bunch of other junk every where starting with “._”. Kill those like this.
del /s /q /f /a ._.*(Why not use “._*'” instead? Apparently, you can sweep up legit files from other things such as Chrome by doing that. Thanks, commenters.)
Important note! This will only search inside the folder you’re in, as well as every folder below that. So, if you wanted to search and clean an entire drive, make sure you’re in the root folder. Get there with this:
cd \You could also put all of this into a .bat file for great automation.
Windows 10 will let you CTRL-V paste into the command line. Friggin sweet. But did you know you can do it in other versions of Windows too? Just right-click on the command window and click Paste. That will save you a little work.
Recently, I installed Lubuntu 11.10 (a netbook-optimized version of Ubuntu) on my wife’s netbook at Lifehacker’s suggestion. And wow–did it make an incredible difference. It’s like a brand new machine compared to Windows 7 running on it, which was getting unbearably slow.
While Lubuntu will look and act pretty familiar to anyone born and raised on Windows, I wanted to make sure when I handed the netbook back to her, she was as comfortable as possible. That meant configuring, among other things, the power management. (Lubuntu wasn’t putting the machine to sleep when the lid was closed by default.)
First, I had to make the power manager run on startup. To do this, you go to:
Menu (think Start Menu) > System Tools > Desktop Session Settings.
Here, you’ll see a number of items. Power Manager should be pretty close to the top. Check the Enabled box, hit OK, then restart.
Now you’ll see a familiar battery icon in the system tray. Yay! Right-click on that to find its preferences, like how long until the computer sleeps, what happens when power buttons are pressed and when the lid is closed, etc.
Anyhow, during my experiments, I accidentally set the power manager’s system tray icon to “Never show icon”. And there was no link to it under the System Tools or Preferences Panel. How the heck was I supposed to get it back? After too much searching, I finally discovered you can run the settings panel from the command line. Open up the terminal (in Lubuntu it’s under Menu > Accessories > LXTerminal). Now type this in and mash enter:
xfce4-power-manager-settings
The settings panel will appear. Breathe sigh of relief and continue.
Commenter Marc shares how to make the power manager’s settings panel appear in the Menu (Start Menu-esque Thing).
If you want to find an entry in the menu, you’ll have to edit /usr/share/applications/xfce4-power-manager-settings.desktop. Change:
OnlyShowIn=XFCE;
to
OnlyShowIn=XFCE;LXDE;
Update: This works all the way up to 10.10 Yosemite.
Ever wanted to have some more organization on your dock? I like to keep things separated more or less by group: everyday things, development tools, and apps that just happen to be open but aren’t permanent fixtures on my dock. I also like to keep my documents and folders separated from minimized things and the trash on the right side.

It’s fairly simple to drop some spacers into your dock. And yes, it uses Terminal, but don’t get squeamish. Just copy and paste the lines you see below. To add spacers to the left side, open up Terminal and paste this:
defaults write com.apple.dock persistent-apps -array-add '{tile-data={}; tile-type="spacer-tile";}'Now mash Enter.
And now you’re wondering why nothing happened. We have to reset the dock to make the space appear. Now paste this:
killall DockAnd mash Enter again. Your dock will vanish and reappear with a space at the end of the left side. You can drag it around (or even off) just like any other icon. Repeat as desired for more spacers!
And for the right side…
Paste this, followed by the usual mashing of Enter afterwards.
defaults write com.apple.dock persistent-others -array-add '{tile-data={}; tile-type="spacer-tile";}'Follow it up with the usual:
killall DockNow speak aloud the word “booyah” or other popular slang term designating success.
Note: I’ve confirmed this also works in OSX 10.7 Lion
Eye-tracking studies can be extremely revealing about how your users are using your site in the real world. Unfortunately, they can also be extremely expensive and time-consuming to conduct. Not everyone in charge of a website has those kind of resources.
Luckily for us, some organizations have made some of their information public, giving us the chance to do gain some insights about our own pages.
Also, Prioritizing Web Usability by Hoa Loranger and Jakob Nielsen provides a good amount of data gathered from eye-tracking studies, among a plethora of other valuable insights.
At first glance, it may look like Microsoft disabled recording of internal—or “what you hear”—sounds in Windows 7. Well, they didn’t. It’s a little trickier, granted, but this is (often) a quick fix.
To enable it:
Now you can record anything you hear through your speakers. If you don’t have a program that can record audio, you can get a nice one called Audacity over here. It’s free.
Update 1:
The old sound mixer isn’t available anymore. Or so it seems! You can use a command prompt, “Run”, or just search for mmsys.cpl. Run that to get the old sound mixer talked about above. Click the Recording tab.
If you’re trying to listen to Line In, you may need to right click it, choose Properties, then click the Listen tab and check Listen to this device.
Update 2:
As near as I can tell, this is a driver issue. In XP/Vista, the driver supported a “What U Hear” mode, which they seem to have axed since, or at least jacked with.
Since there are a variety of Sound Blaster cards and a slew of different driver sets, the best I can do is give you a list of things to try. Each of these options has worked for at least one person I know.
Option 1: Manually uninstall your drivers, then reinstall.
Now there are two ways to proceed. First, try simply restarting your computer and let Windows 7 try to install the driver for you. There’s a chance you’re done at this point. If not, run Windows Update and let Windows 7 find and install the latest driver.
Option 2: Manually reinstall your drivers from your CD.
Apparently, the automatic installer on many of these driver CDs is doing it wrong. To manually install the driver…
Option 3: is to specifically locate SB24_VTDRV_LB_1_04_0065A.exe (if you have an Audigy, SE/LS/Live!24-bit). This version is outdated, but is known to have the “What U Hear” function.
Update 3:
Since originally posting this, I’ve learned that some RealTek chipsets simply don’t support Stereo Mix, meaning you will likely never get this to work without another card, or some serious kludgery. More info as it becomes available.
If you’re like me, your Internet connection is your life — meaning it’s central to your work, education, and entertainment. The only problem with this situation is that it can be easy to get overwhelmed and not be able to keep track of anything anymore! In an effort to improve my online organization, I decided to give Springpad a try.
Springpad is billed as a personal assistant on the go that will help you become more organized and remember things. It has a Chrome browser extention, a web app, and an iPhone app. Also, it’s free (aways one of my favorite price points).
So, how does it work? Let’s say, like me, you find about a dozen interesting bits of stuff on the Internet that you don’t have time to get to right then. You can make bookmarks, but you probably won’t ever get to them. Or, you could use Springpad to save it. Then it’s not only automatically organized into a notebook or category (or you can organize it manually if you wish), it’s accessible from any browser, anywhere or on your phone. Nice.
I found it was pretty smart about organizing stuff for me. For example, for stores it gave me directions, price comparisons, and online links to alternatives without me even asking.
I’ve been using the iPhone app in moments of boredom to look up all the things I’ve saved and finally get around to reading/purchasing/reading/scheduling/and reading things I otherwise would have completely forgotten.
When signing up, you of course have to create a new account — but the good news is that you can link it up to your Google, Yahoo, Twitter, or Facebook accounts. Meaning you won’t have yet another username/password combination to forget. Over and over again.
Overall, I found the service pretty well polished. Smooth experiences all around. I’ll probably keep using it.
Blog Pages