
It’s relevant.
Long-winded intro paragraph where I try to increase SEO by repeating the post title a bunch of different ways, then say, “Keep reading to find out how!” so you’ll scroll past a dozen ads before I finally explain how to do the thing… maybe.
Just kidding. Did you know you can not only block both ads and trackers but also Pinterest results using a browser extension called uBlock Origin? Well, you can. Here’s how.
1. Install uBlock Origin if you haven’t already.
Firefox: Get it here.
Chrome-based browsers (Chrome, Edge, Vivaldi, Brave, etc.): Get it here.
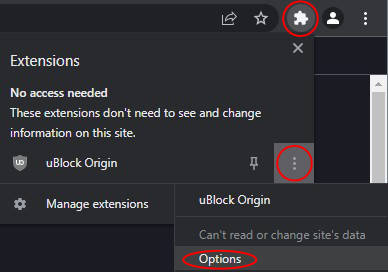
2. Open uBlock Origin’s settings.
There are different ways to do this. In Firefox, a common way is to: Click the uBlock icon (usually in the top right), then click on the gears.
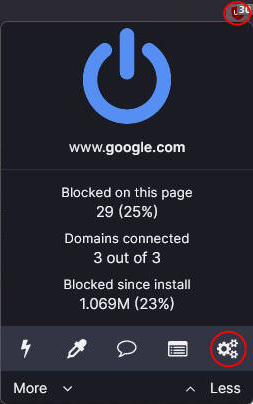
In Chrome, a common way is to: Click the Extensions icon in the top bar, then the vertical dots next to uBlock Origin, then Options.
3. Click the “My Filters” tab and paste this:
! Pinterest Results on Google
google.*##.g:has(a[href*=".pinterest."])
google.*##a[href*=".pinterest."]:nth-ancestor(1)
The result should look something like this:
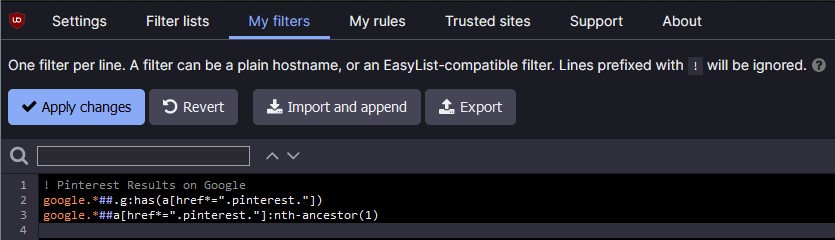
(You may already have some stuff in your “My Filters” tab. If so, just add that code above to the top or bottom.)
4. Mash “Apply changes”.
You should now hopefully find your Google Image Search results free of Pinterest-sourced images.
Log in as root or similarly high-privileged user, then run this query:
SET GLOBAL time_zone = '-00:00';Yes, that’s a negative zero. And it has to be a negative zero–or a positive one–or it won’t work. Because timezones are fun!. (They are not fun.)
Sometimes you want to draw a user’s attention to a certain input or element. One way to do that is to flash or pulse the element. But when you google this, most examples involve flashing the whole background, such as with jQuery UI’s highlight effect. But if you’re like me—as I definitely am— you might think that is a little much. Or maybe it just doesn’t fit well with your design. Here’s how to do it without extra plugins. (Well, except for jQuery UI. Need that.)
There are a lot of methods out there suggested for doing this, such as using .addClass() with a CSS transition, and then removing it with .removeClass(). Problem: It’s difficult and convoluted to get the timing right. If you chain them right together, you get no effect. And they don’t use .delay(), as that only works on animations.
Well, maybe you could do it using .queue()? Yeah, but that’s inelegant to say the least. So let’s use .animate().
$('input').animate({borderColor:'red'});Well, okay. Now our input is red. How do we change it back?
$('input')
  .animate({borderColor:'red'}, 400)
  .delay(400)
  .animate({borderColor:'black'}, 1000);
The “400” you see on the first animate() defines how long the animation will last, in this case 400 milliseconds or 0.4 seconds. The delay() is important because without it, your second animation will begin immediately after the first. Meaning that the moment the border color begins to change, it will also begin to change back. Kind of worthless. Make sure your delay is at least as long as your initial animation. If you want the border color to remain changed for longer, make the delay longer.
I like to make the return animation slower than the first one. It just looks smoother.
Okay, but you’ve probably noticed a problem already. The return animation makes the inputs’ borders black. What if you don’t want black? Well, you could specify exactly what color it should be based on your CSS, but then if you ever change the style, you’ll have to change your code too. Inelegant.
So maybe you’re thinking, “Hey, self. What if we use jQuery to get the color before we change it?” Nice idea, you. Seems easy.
var original_color = $("input").css("border-color");Yeah, that won’t work. Why? Because it seems easy, that’s why. (And other technical reasons blah blah moving on.) But the good news is you’re close. Turns out you’ve got to specify which part of the border you want to get the color from. Again, because your original idea would simply be too easy.
var original_color = $("input").css("border-left-color");I chose left here, but you could use right or top or whatever, since we’re assuming here that your border is the same color on all side. (If not, then I’m sorry. May the fates be kind to you.)
So, let’s put it all together:
var original_color = $('input').css('border-left-color');

$('input')
  .animate({borderColor:'red'}, 400, 'linear')
  .delay(400)
  .animate({borderColor:original_color}, 2800, 'easeOutCirc');
Now you’re asking what’s up with the ‘linear’ and ‘easeOutCirc’. Those are easings, which let you finagle with, well, the easing. Look here for examples. I’ve found that sometimes the return trip can get a little jerky, especially toward the end. So I chose ‘easeOutCirc’, which has the slowest tail end. Feel free to tinker with the timings and easings as you see fit.
Bonus!
I’m highly caffeinated at the moment, so let’s get ambitious. What if we have a whole bunch of inputs we want to highlight? In my case, this would be on a form which I’m validating using jQuery Validation. To make things easy on the user—since it’s bad enough they’re having to deal with validation errors in the first place—I like to scroll to the first error on the form, in case it’s off screen. (Otherwise the form will just sit there dumbly and not give any indication why it’s not submitting. #rage)
$('html, body')
  .animate({scrollTop: $(".error:first")
  .offset().top -90}, 500);
Here’s where we go very slightly crazy with the animations. Assuming there are more than one, let’s get all smooth ‘n smarmy and highlight them one after another:
// Get the border color of the first input on the form.
// (.form-control is a class I have on all inputs.)
var original_color = $("#process-form .form-control:first").css("border-left-color");

// Init this
offset = 0;

// For each one pulse the border color, with the duration extending for each
$('.form-control').each(function(){
  $(this)
    .animate({borderColor:'red'}, 400+offset, 'linear')
    .delay(400+offset)
    .animate({borderColor:original_color}, 2800+offset, 'easeOutCirc');

  // Set this to whatever interval you want between input animations.
  // 200 works pretty well.
  offset = offset + 200;
});
Have fun out there, campers.
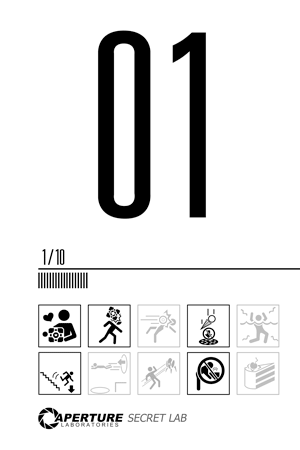
One of my daughter’s friends came over, and upon seeing my home office said, “Whoa! Your dad has a secret lab!” Well, the name stuck. It’s a Secret Lab now. But I felt like it needed a sign. Few things say “secret lab” to me better than Aperture Science, and since a lot of my work involves testing, I put together a 24″x36″ Testing Chamber poster to frame outside the entrance.
Want one of your own? Here’s my PSD file you can download/customize.
So you have a date from your database and it looks like this: 2014-01-31 01:02:03. It so happens that your server is on UTC time. You want to:
- Format the date into something prettier, and
- Offset the date so it’s adjusted for a user’s local time zone.
Ok, great. You only have to SUFFER THE PAIN OF A THOUSAND MIGRAINES AND oh wait it’s actually sort of easy. But man, this took a lot of pain and searching to find. The key is moment.js, a glorious gift to developer-kind.
So the way I’m doing this is to create an HTML5 <time> element, but it can certainly be done other ways. First, after running a DB query, I have PHP produce this:
<time datetime="2014-01-03 12:57:03">
    2014-01-03 12:57:03
</time>
Not very pleasant to look at. So then we do a little moment.js…
var date = $(time).attr('datetime');
var newformat = 'D MMM YYYY [at] h:mm A';
var nice = moment(date, 'YYYY-MM-DD HH:mm:ss').format(new_format);
$('time').html(nice);
There’s some jQuery in there, too, but it isn’t necessary.
What we just did, is we read the date from our <time> element’s datetime attribute, then told moment what format it was in, so it could then spit it back out how we want it to, using .format(), as the human-readable part of the <time> element.
The result looks like this: 3 Jan 2014 at 12:57 PM. Yay. It’s nicer. But that’s still UTC time, and no timezone data was saved in our DB. So we have to add it.
<time datetime="2014-01-03 12:57:03 +0000">
    2014-01-03 12:57:03 UTC
</time>
Note that the stuff added here didn’t come from the DB, I added them manually. The “+0000”, or an offset of 0 hours for UTC time, is what we’re giving to moment.js. The “UTC” is just there for humans to read, just in case something goes wrong or JavaScript is disabled. With those added, we inform moment.js that there’s a timezone offset in there:
var nice = moment(date,'YYYY-MM-DD HH:mm:ss ZZ').format(newformat);See the “ZZ” we added in the middle? Now moment.js knows we have a timezone and what it is. And just like that, it’s been adjusted: 2 Jan 2014 at 5:57 PM (adjusted for America/Denver, -7:00).
It was so easy, that after all the suffering gone through before this point, I’m almost mad. But not really. But just a little bit.


The full quote comes from Sebastian Thrun, the tenured Stanford Professor who left in order to begin exploring new teaching methods online.
During the era when universities were born, “the lecture was the most effective way to convey information. We had the industrialization, we had the invention of celluloid, of digital media, and, miraculously, professors today teach exactly the same way they taught a thousand years ago.”
You can find the full story at The Chronicle of Higher Education.
Threw this together on Thanksgiving. Because it’s true.

Feel free to take and use. (Click for bigger version.)
So, among other productivity methods I’ve been trying this month, I also tried the Hipster PDA method, where essentially you use a small stack of index cards with a big clip to keep track of what you need to get done. (Optionally also with the Getting Things Done and 43 Folders philosophies.)
Most people react to this by saying something like, “Seriously? Index cards.” Yes, seriously. You should probably try it out. And I know several people for whom this PDA works very well!

But I’m not one of them.
Here’s the thing — after literally years trying to get myself to use paper calendars/planners/notebooks/etc., I finally discovered that if my calendar / organizer can’t beep at me, it effectively doesn’t exist.
While trying out the Hipster PDA, I thought I’d finally give it one more shot. See if that was still true. It is.
Sure, I can carefully put everything I want to do today into a planner. I can schedule that appointment for 12:00. And then life will happen, the dean will have a critical project he needs done by tomorrow, I get deep into the zone working on that, and don’t realize until 5:32 pm that we had an appointment at 12:00. That’s pretty much how my life and my brain work.
Furthermore, when you ask me to bring you a document tonight, I’m filing that away in my memory with 32 other things I’m supposed to remember to do by then. 1-17 more are guaranteed to come along before then. Odds are, I’m not bringing your document tonight. Yes, the hPDA is supposed to remind me — if I’m not so absorbed in thinking about the next problem to give it a few minutes. Throughout my test, I only rarely managed to consult my stack of cards effectively. I’m both an easily distract-able and highly focused individual. (Yes, you can be both.)
My solution, the one I’ve been working on for a few years now since I got my first PDA, is to put everything into my digital calendar(s). Events and appointments are obvious, but I also add everything I need to remember later but probably won’t, like “Start walking to class now or you’ll be late”, “Look over the document that Sarah just handed you”, “Respond to Dana’s email”, etc. For things like that, I take my best guess as to when would be a good time to address that matter. 50% of the time I’m wrong, but the reminder brings it back into my consciousness when it would otherwise be lost. Also, it’s easy to tell the reminders to try again later.

I have two calendars: a Google Calendar for more personal and school things, and an Exchange calendar for work-related things. The beauty here is that both calendars live in the cloud — meaning they’re not saved on something I can drop into the sink and destroy forever. And both my phone and computer connect to them, so I’ll always be reminded.
To make things even easier, this month I started using Easy Calendar for the iPhone. I find it much quicker than the default calendar app to add new items, and to see what’s coming up in the next week. Easy Calendar lets you set a default alert for every new item you add, which is good since I add an alert to every single one.
On my computer, I use the aptly named Remind Me Later app (free), which lets me type in natural language, like “Turn in that awesome assignment tonight at 6” The app is smart enough to know that by “tonight” I mean October 25th, and that “6” means 6 p.m., and it automatically puts it into my calendar with a reminder.
 Like I mentioned earlier, sometimes it’s enough only that the system bring an item back into my working memory after it’s been pushed out by any number of a dozen things.
Will this system work for you? Quite possibly. Is it the right one for you? Maybe. Hard to say. Could be that the Hipster PDA works better for you, for example. If my experiments with productivity techniques have done anything (besides give me some great ideas and tools), they’ve reminded me that I’m a cognitive bird of a somewhat different color. But then, aren’t we all in our own ways?
Blog Pages
