Long-winded intro paragraph where I try to increase SEO by repeating the post title a bunch of different ways, then say, “Keep reading to find out how!” so you’ll scroll past a dozen ads before I finally explain how to do the thing… maybe.

Just kidding. Did you know you can not only block both ads and trackers but also Pinterest results using a browser extension called uBlock Origin? Well, you can. Here’s how.

1. Install uBlock Origin if you haven’t already.

Firefox: Get it here.

Chrome-based browsers (Chrome, Edge, Vivaldi, Brave, etc.): Get it here.

2. Open uBlock Origin’s settings.

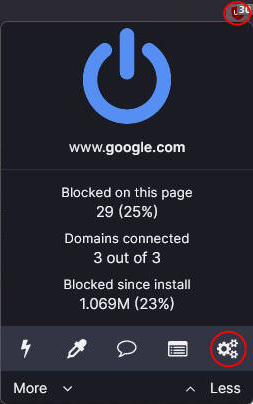
There are different ways to do this. In Firefox, a common way is to: Click the uBlock icon (usually in the top right), then click on the gears.

Image showing how to open the uBlock Origin extension settings in Firefox

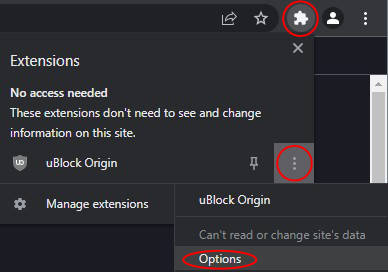
In Chrome, a common way is to: Click the Extensions icon in the top bar, then the vertical dots next to uBlock Origin, then Options.

Image showing how to open the uBlock Origin extension settings in Chrome

3. Click the “My Filters” tab and paste this:

! Pinterest Results on Google
google.*##.g:has(a[href*=".pinterest."])
google.*##a[href*=".pinterest."]:nth-ancestor(1)

The result should look something like this:

Image showing what the above text will look like when pasted into the 'My Filters' tab of uBlock Origin's settings

(You may already have some stuff in your “My Filters” tab. If so, just add that code above to the top or bottom.)

4. Mash “Apply changes”.

You should now hopefully find your Google Image Search results free of Pinterest-sourced images.


Problem: You try to clone/pull/push to a GitHub repo and you have 2FA enabled. It asks for your password, you give it, and you’re told “Invalud username or password” and/or “Authentication failed for your_reponame.”

root@f5bcc0000a:/# git clone https://github.com/awesometoast/professorcoolbread
Cloning into 'professorcoolbread'...
Username for 'https://github.com': awesometoast
Password for 'https://awesometoast@github.com':
remote: Invalid username or password.

Solution: You need to use a personal access token instead of your password.

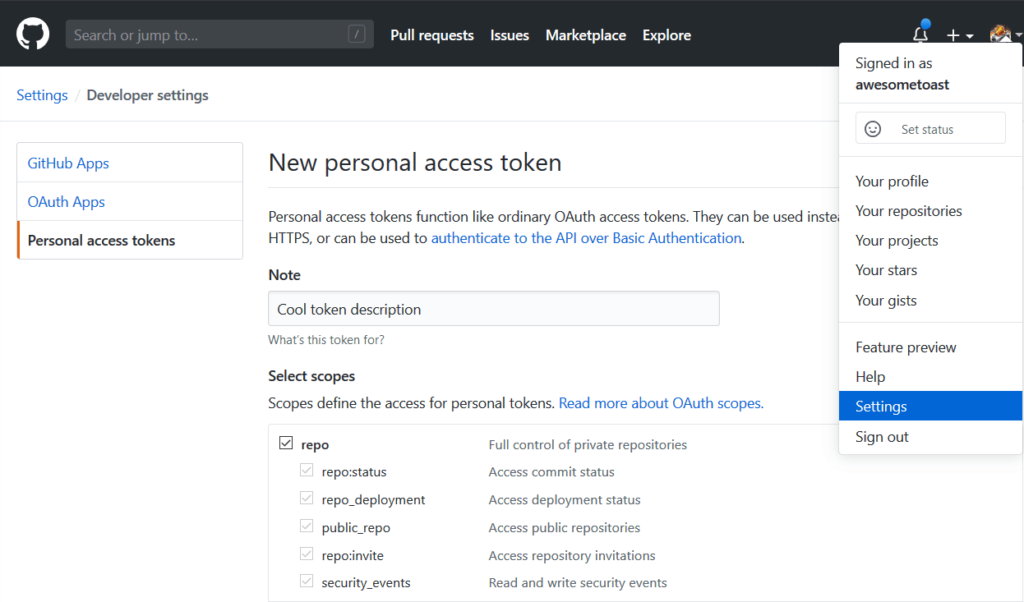
Make one by logging in to your GitHub account. Mash your avatar in the top right, then mash Settings. At the bottom of the sidebar on the left, you’ll see Developer Settings. Mash that.

Or you can just use this URL: https://github.com/settings/tokens

Hit Generate new token near the top of the page.

When you’re asked to “Select scopes”, click repo. You can add more if you need to, but this is the minimum.

Hit the green Generate token button at the bottom of the page. GitHub will hit you back with your new token.

Save that token somewhere secure. Next time you try to git from a command line, paste that token instead of your password. Don’t worry, you won’t need to do this every time.


At least as of version 1.5.1, the awesome Vitalets Bootstrap X-Editable plugin has a maximum date for its datepickers of 2015. Why? I dunno. I just work here. But it’s a simple fix.

After you get things rolling by applying the plugin to whatever element, like so…

$('#thing').editable();

Change the default maximum year thusly:

$.fn.combodate.defaults.maxYear = 2531;

Or whatever year you want.

While you’re there, you could also change the minimum date to something a little more recent than 1970:

$.fn.combodate.defaults.minYear = 2010;

If you’re like me (and I know I am) you don’t love having a bunch of unnecessary stuff loaded when you don’t need it. Like Adobe’s Creative Cloud thingy. It can drain your battery (not by a lot, but still) and clutter up your menu bar.

Adobe Creative Cloud menu bar icon

Also, according to the Little Snitch app, this thing is pinging over dozen different IPs and domains across the interwebs at times. I mean, I understand pinging a couple, but this feels a little extreme.

Anyway. It gets loaded from here:

/Library/LaunchAgents/com.adobe.AdobeCreativeCloud.plist

Run this in Terminal to disable it for your user:

launchctl unload -w /Library/LaunchAgents/com.adobe.AdobeCreativeCloud.plist

If you find you miss it, bring it back thusly:

launchctl load -w /Library/LaunchAgents/com.adobe.AdobeCreativeCloud.plist

You can also delete that .plist after running launchctl unload to shut its shenanigans down even further. I haven’t done that, though, so proceed at your own risk on that one.


Surprisingly, Apple has actually made this pretty easy. This works for Yosemite and El Capitan, and I’m assuming future versions too.

Make sure you have the installer downloaded from the app store. It will delete itself after you use it, but you can download it again.

Format an 8 GB flash drive and plug the thing in. Leaving it named “Untitled” is easiest, but you can change it. Just make sure to change any instances of “Untitled” in the command line below.

For El Capitan, Bust our your Terminal, and copypaste this:

sudo /Applications/Install\ OS\ X\ El\ Capitan.app/Contents/Resources/createinstallmedia --volume /Volumes/Untitled --applicationpath /Applications/Install\ OS\ X\ El\ Capitan.app --nointeraction

Pretty much the same for Yosemite:

sudo /Applications/Install\ OS\ X\ Yosemite.app/Contents/Resources/createinstallmedia --volume /Volumes/Untitled --applicationpath /Applications/Install\ OS\ X\ Yosemite.app --nointeraction

At first glance, it may look like Microsoft disabled recording of internal—or “what you hear”—sounds in Windows 7. Well, they didn’t. It’s a little trickier, granted, but this is (often) a quick fix.

To enable it:

  1. Right click on the speaker icon in the system tray (bottom right).
  2. Choose Recording Devices.
  3. In the empty white space, right-click and choose Show Disabled Devices. You should see Stereo Mix appear in the list.
  4. Right click on Stereo Mix and choose Enable.
  5. Right click on Stereo Mix again, and choose Set as Default Device.

Now you can record anything you hear through your speakers. If you don’t have a program that can record audio, you can get a nice one called Audacity over here. It’s free.

Update 1:

What about Windows 11?

The old sound mixer isn’t available anymore. Or so it seems! You can use a command prompt, “Run”, or just search for mmsys.cpl. Run that to get the old sound mixer talked about above. Click the Recording tab.

If you’re trying to listen to Line In, you may need to right click it, choose Properties, then click the Listen tab and check Listen to this device.

Update 2:

I have a SoundBlaster card and this isn’t working!

As near as I can tell, this is a driver issue. In XP/Vista, the driver supported a “What U Hear” mode, which they seem to have axed since, or at least jacked with.

Since there are a variety of Sound Blaster cards and a slew of different driver sets, the best I can do is give you a list of things to try. Each of these options has worked for at least one person I know.

Option 1: Manually uninstall your drivers, then reinstall.

  1. Mash your Start Ball (start menu) and type in Device Manager
  2. Click the arrow next to Sound, video, and game controllers
  3. Find your SB card, then right click on it and choose Uninstall

Now there are two ways to proceed. First, try simply restarting your computer and let Windows 7 try to install the driver for you. There’s a chance you’re done at this point. If not, run Windows Update and let Windows 7 find and install the latest driver.

Option 2: Manually reinstall your drivers from your CD.
Apparently, the automatic installer on many of these driver CDs is doing it wrong. To manually install the driver…

  1. Insert your driver disc—but don’t let it do anything for you! Close any installers it opens.
  2. Mash your Start Ball (start menu) and type in Device Manager
  3. Click the arrow next to Sound, video, and game controllers
  4. Find your SB card, then right click on it and choose Update Driver Software…
  5. Click on Browse my computer for driver software
  6. Browse to your CD. Look for a “drivers” folder, and then find a sub-folder that fits your computer (64-bit or 32-bit). Install using those drivers and restart. If it still doesn’t work, you might have picked the wrong one (especially if your card stops working altogether). You might want to try a different driver from your disc.

Option 3: is to specifically locate SB24_VTDRV_LB_1_04_0065A.exe (if you have an Audigy, SE/LS/Live!24-bit). This version is outdated, but is known to have the “What U Hear” function.

Update 3:

Possibly Major Caveat

Since originally posting this, I’ve learned that some RealTek chipsets simply don’t support Stereo Mix, meaning you will likely never get this to work without another card, or some serious kludgery. More info as it becomes available.