If you’re here, you probably also never use “Sign in with Google” and are sick of the boxes everywhere. Let’s block ’em.

1. Install uBlock Origin if you haven’t already.

Firefox: Get it here.

Chrome-based browsers (Chrome, Edge, Vivaldi, Brave, etc.): Get it here.

2. Open uBlock Origin’s settings.

There are different ways to do this. In Firefox, a common way is to: Click the uBlock icon (usually in the top right), then click on the gears.

Image showing how to open the uBlock Origin extension settings in Firefox

In Chrome, a common way is to: Click the Extensions icon in the top bar, then the vertical dots next to uBlock Origin, then Options.

Image showing how to open the uBlock Origin extension settings in Chrome

3. Click the “My Filters” tab and paste this:

! Those incessant "Sign in with Google" boxes
accounts.google.com/gsi/*

4. Mash “Apply changes”.

You should now be free of those dang boxes.


First, how do we programmatically show a modal in BS5 (which no longer uses jQuery)? Like so:

const coolModal = new bootstrap.Modal('#cool-fricken-modal');
coolModal.show();

Now, let’s say you want to know if said modal is already open or not. Check it like this:

coolModal._isShown // true/false


Long-winded intro paragraph where I try to increase SEO by repeating the post title a bunch of different ways, then say, “Keep reading to find out how!” so you’ll scroll past a dozen ads before I finally explain how to do the thing… maybe.

Just kidding. Did you know you can not only block both ads and trackers but also Pinterest results using a browser extension called uBlock Origin? Well, you can. Here’s how.

1. Install uBlock Origin if you haven’t already.

Firefox: Get it here.

Chrome-based browsers (Chrome, Edge, Vivaldi, Brave, etc.): Get it here.

2. Open uBlock Origin’s settings.

There are different ways to do this. In Firefox, a common way is to: Click the uBlock icon (usually in the top right), then click on the gears.

Image showing how to open the uBlock Origin extension settings in Firefox

In Chrome, a common way is to: Click the Extensions icon in the top bar, then the vertical dots next to uBlock Origin, then Options.

Image showing how to open the uBlock Origin extension settings in Chrome

3. Click the “My Filters” tab and paste this:

! Pinterest Results on Google
google.*##.g:has(a[href*=".pinterest."])
google.*##a[href*=".pinterest."]:nth-ancestor(1)

The result should look something like this:

Image showing what the above text will look like when pasted into the 'My Filters' tab of uBlock Origin's settings

(You may already have some stuff in your “My Filters” tab. If so, just add that code above to the top or bottom.)

4. Mash “Apply changes”.

You should now hopefully find your Google Image Search results free of Pinterest-sourced images.


Have you noticed this appearing in your context (right-click) menu?

Screenshot of the offending and unsolicited 'Share with Skype' option
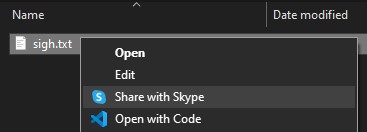
Have you wished to stop noticing it, because it wasn’t there? Well, one option you have to get rid of it is to simply uninstall Skype. But if that feels a little extreme, we can remove it with a registry tweak.

Other tweaks I’ve tried before to banish this thing have involved searching the registry for variations of “share with skype” or “sharewithskype” or “skypesharing”, and while finding those items and removing them helped for a while, it never lasted, because they would just change the name and put it somewhere else. Because I guress Microsoft just really really wants you to have this option whether you asked for it or not. Anyway, let’s avoid a tangent rant about Microsoft’s corporate psychology by just getting to the point.

We’ll explicitly block Skype from putting stuff in the context menu.

And we’ll do it like this. Open your Registry Editor. (If you’re unfamiliar with this, here’s one way to do it. And here’s another.)

Now navigate to:

Computer\HKEY_LOCAL_MACHINE\SOFTWARE\Microsoft\Windows\CurrentVersion\Shell Extensions

If you haven’t done this before, you do it by double-clicking folders in the left sidebar until you get here:

HKEY_LOCAL_MACHINE\SOFTWARE\Microsoft\Windows\CurrentVersion\Shell ExtensionsNow we’ll add a new key (those things that look like folders) called “Blocked”. (Skip ahead if you already have it there.) Right click on the Shell Extensions “folder” and choose New > Key.

Adding a new key in Regedit
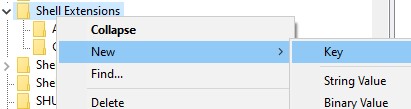
It will appear as “New Key #1”. Change the name to Blocked. Once that’s done, make sure the Blocked key is selected. (Double-click it if you want to be sure.) You should be looking at something very much like this:

Screenshot of the newly added Blocked registry key

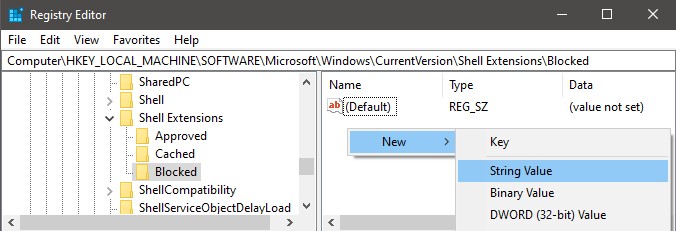
Right-click in the empty space to the right, then choose New > String Value. For the name, give it this:

{776DBC8D-7347-478C-8D71-791E12EF49D8}

Yup, exactly that, with the curly braces and everything. Once that’s done, double-click that weirdly named entry, and under Value data, enter Skype. The end result should look like this:

Screenshot of our new key and string with name "{776DBC8D-7347-478C-8D71-791E12EF49D8}" and value "Skype"Now log out and back in again–or simply restart your machine–and your context menus should be Share-with-Skype free.

The TL;DR version:

Add the REG_SZ key "{776DBC8D-7347-478C-8D71-791E12EF49D8}"="Skype" to HKLM\SOFTWARE\Microsoft\Windows\CurrentVersion\Shell Extensions\Blocked and reboot.


Problem: You try to clone/pull/push to a GitHub repo and you have 2FA enabled. It asks for your password, you give it, and you’re told “Invalud username or password” and/or “Authentication failed for your_reponame.”

root@f5bcc0000a:/# git clone https://github.com/awesometoast/professorcoolbread
Cloning into 'professorcoolbread'...
Username for 'https://github.com': awesometoast
Password for 'https://awesometoast@github.com':
remote: Invalid username or password.

Solution: You need to use a personal access token instead of your password.

Make one by logging in to your GitHub account. Mash your avatar in the top right, then mash Settings. At the bottom of the sidebar on the left, you’ll see Developer Settings. Mash that.

Or you can just use this URL: https://github.com/settings/tokens

Hit Generate new token near the top of the page.

When you’re asked to “Select scopes”, click repo. You can add more if you need to, but this is the minimum.

Hit the green Generate token button at the bottom of the page. GitHub will hit you back with your new token.

Save that token somewhere secure. Next time you try to git from a command line, paste that token instead of your password. Don’t worry, you won’t need to do this every time.


Log in as root or similarly high-privileged user, then run this query:

SET GLOBAL time_zone = '-00:00';

Yes, that’s a negative zero. And it has to be a negative zero–or a positive one–or it won’t work. Because timezones are fun!. (They are not fun.)


So you have a form in your app, and you want to tab from an NSTextField to an NSPopUpButton. You know, like any normal HTML form would using the tabindex attribute.

Well, you could use the dandy nextKeyView property, which lets you define which input should get focus next after tabbing. You could do it like this:

class RightViewController: NSViewController {

  @IBOutlet var rageTextField: NSTextField!
  @IBOutlet var furyPopup: MyNSPopUpButton!

  override func viewDidLoad() {
    super.viewDidLoad()
    self.rageTextField.nextKeyView = furyPopup
  }
}

It won’t work. It’ll work fine between NSTextFields and other stuff, but not your NSPopUpButton. Why? Well, [INSERT INCOHERENT SEETHE-RANTING HERE]. That’s why.

Look, the short explanation is that with NSPopUpButtons, canBecomeKeyView is set to false. Fix it by overriding using a subclass.

class MyNSPopUpButton: NSPopUpButton {
  override var canBecomeKeyView: Bool {return true} // @&$('#$')!!
}

class ViewController: NSViewController {

  @IBOutlet var rageTextField: NSTextField!
  @IBOutlet var furyPopup: MyNSPopUpButton! // <-- LOOK AT THE "MY"

  override func viewDidLoad() {
    super.viewDidLoad()

    print("(furyPopup.canBecomeKeyView)") // should be true

    self.rageTextField.nextKeyView = furyPopup // should work now
  }
}

Wait, one more thing. Don’t forget to change the popup’s class in IB, too:


The Synology RT2600ac router is, in my opinion, very good. That said, there’s a chance you may encounter a show-stopping issue when setting up a new one. On the 2nd setup screen, you might see a field for Country. It looks like a drop down, but it has no options. Manually typing a country name doesn’t work, either.

Screenshot of useless Country input

Worry not. You don’t need to return it. We can fix this by doing a factory reset.

Yes, a factory reset on a device you presumably… just got from the factory. I know.

Grab a paper clip (or something similarly small and poke-ey) and do this:

  1. Make sure the router is on.
  2. Find the RESET button on the back. Poke it with your clip or other poker, and hold for at least 10 seconds. You’ll see the LEDs on the front flash as if the router were rebooting. That’s because it’s rebooting.
  3. Don’t panic while it takes several minutes to come back up.
  4. Try the setup again.

When you get to the 2nd screen, the Country field should be completely gone, and you’ll be able to proceed.
Huzzah.


macOS uses VNC for remote management, and has a built-in server and viewer. (Turn on the server under System Preferences > Sharing and mash the checkbox for Screen Sharing.)

But if you’re here, you probably knew that already, and you want to change the default VNC port from 5900 to something else.

Get out your terminal:

sudo nano /System/Library/LaunchDaemons/com.apple.screensharing.plist

Or use vim, or whatever. It’s your party. Your terminal party.

You’re looking for this line (line 34 in El Capitan, and since Lion):

<string>vnc-server</string>

You want to change the text “vnc-server” to whatever you want your port to be. For example, this would make it port 1337:

<string>1337</string>

Don’t use port 1337.

Then turn Screen Sharing off/on again in preferences, or restart your machine. It should use the new port now.

Connecting to it from a Mac

Use the built-in VNC viewer by going to Finder > Go > Connect to Server… Under “Server Address” enter:

vnc://your.ip.or.hostname.here.com::1337

Blog Pages