macOS uses VNC for remote management, and has a built-in server and viewer. (Turn on the server under System Preferences > Sharing and mash the checkbox for Screen Sharing.)
But if you’re here, you probably knew that already, and you want to change the default VNC port from 5900 to something else.
If you’re like me (and I know I am) you don’t love having a bunch of unnecessary stuff loaded when you don’t need it. Like Adobe’s Creative Cloud thingy. It can drain your battery (not by a lot, but still) and clutter up your menu bar.
Also, according to the Little Snitch app, this thing is pinging over dozen different IPs and domains across the interwebs at times. I mean, I understand pinging a couple, but this feels a little extreme.
You can also delete that .plist after running launchctl unload to shut its shenanigans down even further. I haven’t done that, though, so proceed at your own risk on that one.
Surprisingly, Apple has actually made this pretty easy. This works for Yosemite and El Capitan, and I’m assuming future versions too.
Make sure you have the installer downloaded from the app store. It will delete itself after you use it, but you can download it again.
Format an 8 GB flash drive and plug the thing in. Leaving it named “Untitled” is easiest, but you can change it. Just make sure to change any instances of “Untitled” in the command line below.
For El Capitan, Bust our your Terminal, and copypaste this:
So when a new version of any OS comes out, I like to do a clean install. On Macs, this has usually been fairly easy, since HFS+ partitions are pretty flexible — they’ll let you add/remove/resize without a lot of hassle.
Until Yosemite.
In the past, I’ve made a new partition on my drive, installed the new OS X (like Mavericks), copied all my files from the old partition to the new one. Once I’m sure that all is fine and dandy, I will go back and delete the older partition and give the space to the new one.
But when I tried this with 10.10 Yosemite, I ran into a new problem. Partitions were no longer flexible. I couldn’t delete or resize any of them. I found this out after spending a full day getting the new Yosemite partition just right.
Some research found that Yosemite will change its partition from HFS+ to “Core Storage”. (According to Ars Technica, there’s not a clear reason why, either.) I’m not sure of all the technical details, but this apparently killed flexibility. So my new Yosemite install was stuck on a partition with only 10GB of free space, when it could have had 400 from the old Mavericks partition. It wouldn’t even let me delete the Mavericks partition. Everything was locked.
Fortunately, I found a solution. You can convert Yosemite’s Core Storage partition back to HFS+. Once I did that, Disk Utility worked fine again. Some notes:
This is not destructive. You won’t lose anything.
This only works if you have not encrypted the partition with FileVault.
Here’s how:
First, you have to get something called a lvUUID for the partition. (Don’t worry about the annoying acronym. This is all scarier than it looks.)
Open Terminal, and run this (you can copy/paste):
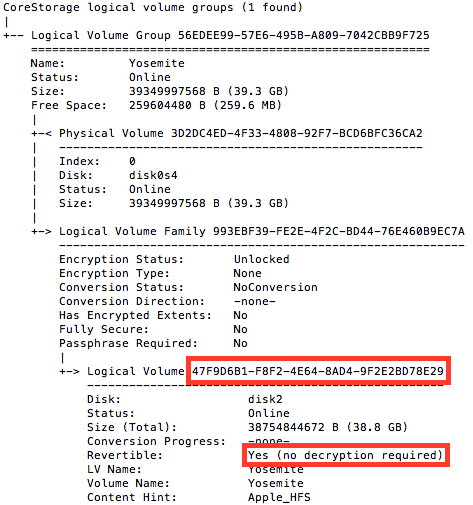
diskutil cs list
This will give you a list of partitions similar to this:
Thanks to BrettApple at the MacRumors forum for this.
Okay. See how it says “Revertible: Yes”? That means we can convert it back. You’ll need that super-long string of letters/numbers. In the same Terminal window, type:
diskutil coreStorage revert [THAT LONG STRING OF STUFF]
The results should be quick. Only seconds. Once that was finished, I was able to delete the Mavericks partition and resize my new Yosemite partition to fill all available space.
In iTunes 10, you could skip to the next/previous track when Repeat One was turned on. In 11 & 12, they assume that by “skip ahead”, you somehow mean “rewind this track”.
This really bothers some people. Do not judge us, we have our reasons!
And here’s one way to fix it.
It took some work, but I finally came up with some AppleScript to handle this. Basically, we’re checking to see if Repeat One is on. If it is, we quickly disable it, skip to the next (or previous) track, and then turn it back on. Apple borked the old way of doing this (same with shuffle), so we’re using menu bar items instead.
-- This script lets you skip songs in iTunes 11/12 even if repeat one is on

tell application "System Events"
	tell process "iTunes"

		-- Find out if repeat one is on
		-- This finds out if the menu item is checked
		set isRepeatOneOn to (value of attribute "AXMenuItemMarkChar" of menu item 3 of menu 1 of menu item "Repeat" of menu 1 of menu bar item "Controls" of menu bar 1 as string) ≠ ""

		if isRepeatOneOn is true then

			-- Set repeat to ALL
			click menu item 2 of menu 1 of menu item "Repeat" of menu 1 of menu bar item "Controls" of menu bar 1

			-- Skip to previous track...
			click menu item "Previous" of menu 1 of menu bar item "Controls" of menu bar 1

			-- Need this, or the next step happens too fast
			delay 0.1

			-- Reactivate Repeat One
			click menu item 3 of menu 1 of menu item "Repeat" of menu 1 of menu bar item "Controls" of menu bar 1

		else
			-- Just skip to previous track
			click menu item "Previous" of menu 1 of menu bar item "Controls" of menu bar 1
		end if

	end tell
end tell
You can copy/paste that, or you can just download the script files here.
There’s one script for skip ahead, and one for skip back.
Wait—how do I use these?
Valid question. They’re not all that useful, really—unless you assign them to hotkeys.
So, among other productivity methods I’ve been trying this month, I also tried the Hipster PDA method, where essentially you use a small stack of index cards with a big clip to keep track of what you need to get done. (Optionally also with the Getting Things Done and 43 Folders philosophies.)
Most people react to this by saying something like, “Seriously? Index cards.” Yes, seriously. You should probably try it out. And I know several people for whom this PDA works very well!
Like this.
But I’m not one of them.
Here’s the thing — after literally years trying to get myself to use paper calendars/planners/notebooks/etc., I finally discovered that if my calendar / organizer can’t beep at me, it effectively doesn’t exist.
While trying out the Hipster PDA, I thought I’d finally give it one more shot. See if that was still true. It is.
Sure, I can carefully put everything I want to do today into a planner. I can schedule that appointment for 12:00. And then life will happen, the dean will have a critical project he needs done by tomorrow, I get deep into the zone working on that, and don’t realize until 5:32 pm that we had an appointment at 12:00. That’s pretty much how my life and my brain work.
Furthermore, when you ask me to bring you a document tonight, I’m filing that away in my memory with 32 other things I’m supposed to remember to do by then. 1-17 more are guaranteed to come along before then. Odds are, I’m not bringing your document tonight. Yes, the hPDA is supposed to remind me — if I’m not so absorbed in thinking about the next problem to give it a few minutes. Throughout my test, I only rarely managed to consult my stack of cards effectively. I’m both an easily distract-able and highly focused individual. (Yes, you can be both.)
My solution, the one I’ve been working on for a few years now since I got my first PDA, is to put everything into my digital calendar(s). Events and appointments are obvious, but I also add everything I need to remember later but probably won’t, like “Start walking to class now or you’ll be late”, “Look over the document that Sarah just handed you”, “Respond to Dana’s email”, etc. For things like that, I take my best guess as to when would be a good time to address that matter. 50% of the time I’m wrong, but the reminder brings it back into my consciousness when it would otherwise be lost. Also, it’s easy to tell the reminders to try again later.
I have two calendars: a Google Calendar for more personal and school things, and an Exchange calendar for work-related things. The beauty here is that both calendars live in the cloud — meaning they’re not saved on something I can drop into the sink and destroy forever. And both my phone and computer connect to them, so I’ll always be reminded.
To make things even easier, this month I started using Easy Calendar for the iPhone. I find it much quicker than the default calendar app to add new items, and to see what’s coming up in the next week. Easy Calendar lets you set a default alert for every new item you add, which is good since I add an alert to every single one.
On my computer, I use the aptly named Remind Me Later app (free), which lets me type in natural language, like “Turn in that awesome assignment tonight at 6” The app is smart enough to know that by “tonight” I mean October 25th, and that “6” means 6 p.m., and it automatically puts it into my calendar with a reminder.
Like I mentioned earlier, sometimes it’s enough only that the system bring an item back into my working memory after it’s been pushed out by any number of a dozen things.
Will this system work for you? Quite possibly. Is it the right one for you? Maybe. Hard to say. Could be that the Hipster PDA works better for you, for example. If my experiments with productivity techniques have done anything (besides give me some great ideas and tools), they’ve reminded me that I’m a cognitive bird of a somewhat different color. But then, aren’t we all in our own ways?
If you use a Mac and Windows together, you’re likely to end up with a bunch of hidden .DS_STORE files all over your Windows drives. You can easily search and destroy them all using this command:
(Open the command line first of course. You can do this by mashing Win + R, then typing “cmd”. Or just type “cmd” in the Start Menu search box.)
del /s /q /f /a .DS_STORE
That will find every instance of this Mac resource file and delete it. Good times. But wait there’s more. In addition to DS_STORE, OSX will also put a bunch of other junk every where starting with “._”. Kill those like this.
del /s /q /f /a ._.*
(Why not use “._*'” instead? Apparently, you can sweep up legit files from other things such as Chrome by doing that. Thanks, commenters.)
Important note! This will only search inside the folder you’re in, as well as every folder below that. So, if you wanted to search and clean an entire drive, make sure you’re in the root folder. Get there with this:
cd \
You could also put all of this into a .bat file for great automation.
Pro tip: copy-pasting into your command window
Windows 10 will let you CTRL-V paste into the command line. Friggin sweet. But did you know you can do it in other versions of Windows too? Just right-click on the command window and click Paste. That will save you a little work.
Update: This works all the way up to 10.10 Yosemite.
Ever wanted to have some more organization on your dock? I like to keep things separated more or less by group: everyday things, development tools, and apps that just happen to be open but aren’t permanent fixtures on my dock. I also like to keep my documents and folders separated from minimized things and the trash on the right side.
A-like so
It’s fairly simple to drop some spacers into your dock. And yes, it uses Terminal, but don’t get squeamish. Just copy and paste the lines you see below. To add spacers to the left side, open up Terminal and paste this:
And now you’re wondering why nothing happened. We have to reset the dock to make the space appear. Now paste this:
killall Dock
And mash Enter again. Your dock will vanish and reappear with a space at the end of the left side. You can drag it around (or even off) just like any other icon. Repeat as desired for more spacers!
And for the right side…
Paste this, followed by the usual mashing of Enter afterwards.
iTunes 10. Good stuff. But I’m really surprised that Apple — who are known for their design expertise — would not only violate a well-known design convention, but their own well-known design convention with those stoplight control buttons. It may seem like a simple annoyance, but multiply it by 1000 times over the course of a week or a month, and you have a fairly irritating problem.
Fortunately, putting those buttons back the way they should be is pretty easy. (Mac only)
1. Close iTunes if it’s open. 2. Open up Terminal. 3. Copy/paste this line into it:


 In iTunes 10, you could skip to the next/previous track when Repeat One was turned on. In 11 & 12, they assume that by “skip ahead”, you somehow mean “rewind this track”.

 Like I mentioned earlier, sometimes it’s enough only that the system bring an item back into my working memory after it’s been pushed out by any number of a dozen things.
