Moving to Mandrill to SparkPost this week? (A lot of us are thanks to this.)

In Mandrill (and possibly other transactional email services) we can use the API to send emails using templates. We send a bunch of information including recipients, content, metadata, and subject, ad we let ‘er fly. Boom, done.

For the most part, I’ve found SparkPost to be pretty similar, except on one point: subject lines. Specifically for emails sent using templates. When you’re using a template, several options in your API call get ignored, including “subject”. It defaults to whatever you set when you created the template in the SparkPost UI. (It’s a required field.)

Worse, at the time of this writing anyway, there’s no clear way to fix it. It isn’t specifically covered in the documentation, and the support center answers (such as this one) are… not ideally helpful, we’ll say that.

But there’s good news. After losing a fair number of hours and hitpoints on this, I found out that…

It’s actually pretty simple

With SparkPost templates, we fill our template placeholders (name, content, etc) with curly-bracketed variables such as:

{{name}}

(Details on this are in their docs over here.) That’s what we put in the template to specify that this is the placeholder for the ‘name’ field in the substitutionData JSON array we’re sending them. Here’s a simple example of that part of our API call: (Also called a “transmission” in SparkPost world.)

{
   "substitutionData": {
      "name": "Tester Gunderson",
      "astrological_sign": "Quagmire",
      "favorite_color": "blue",
      "main_email_body": "This message is to transactionally confirm that your sign is 'Quagmire' (we didn't know that was a thing) and your favorite color is 'blue'."	
   }
}

Throw a key in there for Subject

With the rest of your substitutionData, add your desired subject line:

"subject": "We're sending this email to blue-loving Quagmires"

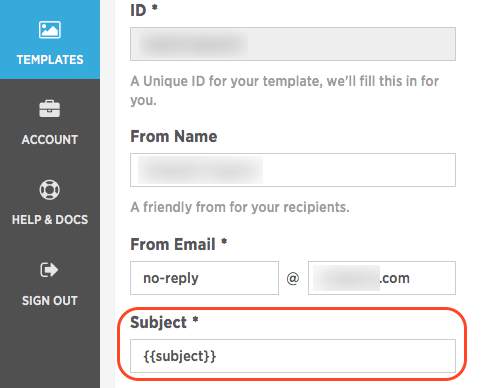
And then in the SparkPost UI, edit your template and change the subject line to {{subject}}. (Or whatever you want to name the variable.)

Setting dynamic subject lines in SparkPost templates
Yep. You can put variables in there.


And you’re done.

Well, maybe. It depends on your use case. If you want to add dynamic variables to the subject line (like the recipient’s first name) you have another battle ahead of you. Hopefully, as more of us former Mandrill users migrate over certain questions can be answered more clearly than they are as of the time I’m writing this. (April 19 2016)

Good luck out there!


Sometimes you need to convert state names to their abbreviations. Sometimes you need to convert state abbreviations to their names.

Well, this function does both.

Give it a valid state abbreviation, and it’ll give you the name. Give it a name, and it’ll give you the abbreviation. (e.g. OR -> Oregon, Oregon -> OR). Enjoy! Hope it helps.

/* -----------------------------------
 * CONVERT STATE NAMES!
 * Goes both ways. e.g.
 * $name = 'Orgegon' -> returns "OR"
 * $name = 'OR' -> returns "Oregon"
 * ----------------------------------- */
function convertState($name) {
   $states = array(
      array('name'=>'Alabama', 'abbr'=>'AL'),
      array('name'=>'Alaska', 'abbr'=>'AK'),
      array('name'=>'Arizona', 'abbr'=>'AZ'),
      array('name'=>'Arkansas', 'abbr'=>'AR'),
      array('name'=>'California', 'abbr'=>'CA'),
      array('name'=>'Colorado', 'abbr'=>'CO'),
      array('name'=>'Connecticut', 'abbr'=>'CT'),
      array('name'=>'District of Columbia', 'abbr' => 'DC'),
      array('name'=>'Delaware', 'abbr'=>'DE'),
      array('name'=>'Florida', 'abbr'=>'FL'),
      array('name'=>'Georgia', 'abbr'=>'GA'),
      array('name'=>'Hawaii', 'abbr'=>'HI'),
      array('name'=>'Idaho', 'abbr'=>'ID'),
      array('name'=>'Illinois', 'abbr'=>'IL'),
      array('name'=>'Indiana', 'abbr'=>'IN'),
      array('name'=>'Iowa', 'abbr'=>'IA'),
      array('name'=>'Kansas', 'abbr'=>'KS'),
      array('name'=>'Kentucky', 'abbr'=>'KY'),
      array('name'=>'Louisiana', 'abbr'=>'LA'),
      array('name'=>'Maine', 'abbr'=>'ME'),
      array('name'=>'Maryland', 'abbr'=>'MD'),
      array('name'=>'Massachusetts', 'abbr'=>'MA'),
      array('name'=>'Michigan', 'abbr'=>'MI'),
      array('name'=>'Minnesota', 'abbr'=>'MN'),
      array('name'=>'Mississippi', 'abbr'=>'MS'),
      array('name'=>'Missouri', 'abbr'=>'MO'),
      array('name'=>'Montana', 'abbr'=>'MT'),
      array('name'=>'Nebraska', 'abbr'=>'NE'),
      array('name'=>'Nevada', 'abbr'=>'NV'),
      array('name'=>'New Hampshire', 'abbr'=>'NH'),
      array('name'=>'New Jersey', 'abbr'=>'NJ'),
      array('name'=>'New Mexico', 'abbr'=>'NM'),
      array('name'=>'New York', 'abbr'=>'NY'),
      array('name'=>'North Carolina', 'abbr'=>'NC'),
      array('name'=>'North Dakota', 'abbr'=>'ND'),
      array('name'=>'Ohio', 'abbr'=>'OH'),
      array('name'=>'Oklahoma', 'abbr'=>'OK'),
      array('name'=>'Oregon', 'abbr'=>'OR'),
      array('name'=>'Pennsylvania', 'abbr'=>'PA'),
      array('name'=>'Rhode Island', 'abbr'=>'RI'),
      array('name'=>'South Carolina', 'abbr'=>'SC'),
      array('name'=>'South Dakota', 'abbr'=>'SD'),
      array('name'=>'Tennessee', 'abbr'=>'TN'),
      array('name'=>'Texas', 'abbr'=>'TX'),
      array('name'=>'Utah', 'abbr'=>'UT'),
      array('name'=>'Vermont', 'abbr'=>'VT'),
      array('name'=>'Virginia', 'abbr'=>'VA'),
      array('name'=>'Washington', 'abbr'=>'WA'),
      array('name'=>'West Virginia', 'abbr'=>'WV'),
      array('name'=>'Wisconsin', 'abbr'=>'WI'),
      array('name'=>'Wyoming', 'abbr'=>'WY'),
      array('name'=>'Virgin Islands', 'abbr'=>'V.I.'),
      array('name'=>'Guam', 'abbr'=>'GU'),
      array('name'=>'Puerto Rico', 'abbr'=>'PR')
   );

   $return = false;   
   $strlen = strlen($name);

   foreach ($states as $state) :
      if ($strlen < 2) {
         return false;
      } else if ($strlen == 2) {
         if (strtolower($state['abbr']) == strtolower($name)) {
            $return = $state['name'];
            break;
         }   
      } else {
         if (strtolower($state['name']) == strtolower($name)) {
            $return = strtoupper($state['abbr']);
            break;
         }         
      }
   endforeach;
   
   return $return;
} // end function convertState()

At least as of version 1.5.1, the awesome Vitalets Bootstrap X-Editable plugin has a maximum date for its datepickers of 2015. Why? I dunno. I just work here. But it’s a simple fix.

After you get things rolling by applying the plugin to whatever element, like so…

$('#thing').editable();

Change the default maximum year thusly:

$.fn.combodate.defaults.maxYear = 2531;

Or whatever year you want.

While you’re there, you could also change the minimum date to something a little more recent than 1970:

$.fn.combodate.defaults.minYear = 2010;

If you’re like me, you don’t love it when your Mac makes that sign-in sound every time you open the lid. (Assuming you use iMessage/Messages for any IM services.) Here’s how to disable it. (And only it.)

  1. Make sure Messages is closed.
  2. Go to your Applications folder.
  3. Find Messages.app and right-click it. Choose Show Package Contents.
  4. Find the Resources folder.
  5. Look for a file called Logged In.aiff.
  6. Delete that mess.

Next time you open it, that sound will be gone. (Note: This may not work on El Capitan.)


If you’re like me (and I know I am) you don’t love having a bunch of unnecessary stuff loaded when you don’t need it. Like Adobe’s Creative Cloud thingy. It can drain your battery (not by a lot, but still) and clutter up your menu bar.

Adobe Creative Cloud menu bar icon

Also, according to the Little Snitch app, this thing is pinging over dozen different IPs and domains across the interwebs at times. I mean, I understand pinging a couple, but this feels a little extreme.

Anyway. It gets loaded from here:

/Library/LaunchAgents/com.adobe.AdobeCreativeCloud.plist

Run this in Terminal to disable it for your user:

launchctl unload -w /Library/LaunchAgents/com.adobe.AdobeCreativeCloud.plist

If you find you miss it, bring it back thusly:

launchctl load -w /Library/LaunchAgents/com.adobe.AdobeCreativeCloud.plist

You can also delete that .plist after running launchctl unload to shut its shenanigans down even further. I haven’t done that, though, so proceed at your own risk on that one.


Surprisingly, Apple has actually made this pretty easy. This works for Yosemite and El Capitan, and I’m assuming future versions too.

Make sure you have the installer downloaded from the app store. It will delete itself after you use it, but you can download it again.

Format an 8 GB flash drive and plug the thing in. Leaving it named “Untitled” is easiest, but you can change it. Just make sure to change any instances of “Untitled” in the command line below.

For El Capitan, Bust our your Terminal, and copypaste this:

sudo /Applications/Install\ OS\ X\ El\ Capitan.app/Contents/Resources/createinstallmedia --volume /Volumes/Untitled --applicationpath /Applications/Install\ OS\ X\ El\ Capitan.app --nointeraction

Pretty much the same for Yosemite:

sudo /Applications/Install\ OS\ X\ Yosemite.app/Contents/Resources/createinstallmedia --volume /Volumes/Untitled --applicationpath /Applications/Install\ OS\ X\ Yosemite.app --nointeraction

Sometimes you want to draw a user’s attention to a certain input or element. One way to do that is to flash or pulse the element. But when you google this, most examples involve flashing the whole background, such as with jQuery UI’s highlight effect. But if you’re like me—as I definitely am— you might think that is a little much. Or maybe it just doesn’t fit well with your design. Here’s how to do it without extra plugins. (Well, except for jQuery UI. Need that.)

There are a lot of methods out there suggested for doing this, such as using .addClass() with a CSS transition, and then removing it with .removeClass(). Problem: It’s difficult and convoluted to get the timing right. If you chain them right together, you get no effect. And they don’t use .delay(), as that only works on animations.

Well, maybe you could do it using .queue()? Yeah, but that’s inelegant to say the least. So let’s use .animate().

$('input').animate({borderColor:'red'});

Well, okay. Now our input is red. How do we change it back?

$('input')
  .animate({borderColor:'red'}, 400)
  .delay(400)
  .animate({borderColor:'black'}, 1000);

The “400” you see on the first animate() defines how long the animation will last, in this case 400 milliseconds or 0.4 seconds. The delay() is important because without it, your second animation will begin immediately after the first. Meaning that the moment the border color begins to change, it will also begin to change back. Kind of worthless. Make sure your delay is at least as long as your initial animation. If you want the border color to remain changed for longer, make the delay longer.

I like to make the return animation slower than the first one. It just looks smoother.

Okay, but you’ve probably noticed a problem already. The return animation makes the inputs’ borders black. What if you don’t want black? Well, you could specify exactly what color it should be based on your CSS, but then if you ever change the style, you’ll have to change your code too. Inelegant.

So maybe you’re thinking, “Hey, self. What if we use jQuery to get the color before we change it?” Nice idea, you. Seems easy.

var original_color = $("input").css("border-color");

Yeah, that won’t work. Why? Because it seems easy, that’s why. (And other technical reasons blah blah moving on.) But the good news is you’re close. Turns out you’ve got to specify which part of the border you want to get the color from. Again, because your original idea would simply be too easy.

var original_color = $("input").css("border-left-color");

I chose left here, but you could use right or top or whatever, since we’re assuming here that your border is the same color on all side. (If not, then I’m sorry. May the fates be kind to you.)

So, let’s put it all together:

var original_color = $('input').css('border-left-color');

$('input')
  .animate({borderColor:'red'}, 400, 'linear')
  .delay(400)
  .animate({borderColor:original_color}, 2800, 'easeOutCirc');

Now you’re asking what’s up with the ‘linear’ and ‘easeOutCirc’. Those are easings, which let you finagle with, well, the easing. Look here for examples. I’ve found that sometimes the return trip can get a little jerky, especially toward the end. So I chose ‘easeOutCirc’, which has the slowest tail end. Feel free to tinker with the timings and easings as you see fit.

Bonus!

I’m highly caffeinated at the moment, so let’s get ambitious. What if we have a whole bunch of inputs we want to highlight? In my case, this would be on a form which I’m validating using jQuery Validation. To make things easy on the user—since it’s bad enough they’re having to deal with validation errors in the first place—I like to scroll to the first error on the form, in case it’s off screen. (Otherwise the form will just sit there dumbly and not give any indication why it’s not submitting. #rage)

$('html, body')
  .animate({scrollTop: $(".error:first")
  .offset().top -90}, 500);

Here’s where we go very slightly crazy with the animations. Assuming there are more than one, let’s get all smooth ‘n smarmy and highlight them one after another:

// Get the border color of the first input on the form.
// (.form-control is a class I have on all inputs.)
var original_color = $("#process-form .form-control:first").css("border-left-color");

// Init this
offset = 0;

// For each one pulse the border color, with the duration extending for each
$('.form-control').each(function(){
  $(this)
    .animate({borderColor:'red'}, 400+offset, 'linear')
    .delay(400+offset)
    .animate({borderColor:original_color}, 2800+offset, 'easeOutCirc');

  // Set this to whatever interval you want between input animations.
  // 200 works pretty well.
  offset = offset + 200;
});

Have fun out there, campers.


Some call it “bridge” mode. The point is you want your TP-LINK to play nice with another router from which your internet actually flows. Like if you have a fiber/DSL/psychic router you can’t replace because ISP reasons but you want some wifi that doesn’t totally suck. For example.

The reason this can be confusing with the Archer series is that many other routers have a setting like “AP mode” that you turn on and you’re done. Or Their WAN (a.k.a “internet”) port can be used for this job. While it’s a nice piece of router, the Archer doesn’t make it clear how to do this. And you may be dealing with/swearing at messages like “WAN and LAN cannot be on the same subnet”.

Anyway, let’s kick this pig! (Translated: “Let’s do this.”) I’ll just start from the top. You can skip ahead if you’ve already done any/some of these.

1. Don’t connect it to your main router yet

Just plug it in and hit the On switch.

2. Log on to that mess

Connect your computer to it with an Ethernet cable, OR hop on one of its default SSIDs it will start broadcasting automagically. (TP-LINK-XXXX).

With that done, head on over to http://192.168.0.1. The default login is “admin” for both username and password. Change that later. Do it.

3. Completely ignore the rest of the quick installation guide

Woman tossing a quick start guide instead of a flower boquet
Toss that thing. Or save it for later. Whichever.

4. Set a static IP address

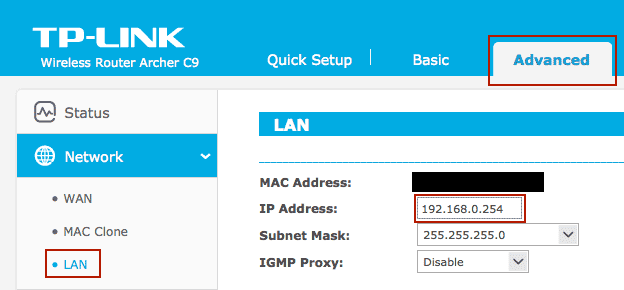
We need your TP-LINK to have a different IP than your internets-providing router, which may likely also be using 192.168.0.1. We don’t want them arguing with each other. This can be whatever you want, so long as it doesn’t conflict with anything else on your network. I usually go with 192.168.0.254.

Visual guide for what to do here.
Ignore “WAN” completely.

5. Disable DHCP

Your other router will be on DHCP duty, so the TP-LINK shouldn’t bother.

DHCP

6. Other stuff

Change the SSID names and turn on WPA2 security. And change the router login (under Settings > Password and not under Security like you’re very reasonably assuming).

7. Hook it up

Plug the Archer in to your main router, Ethernet-cable-style. Do NOT use the TP-LINK’s WAN port. Use any of the other four.

8. Dance

Because you’re done now.

Wheezy Waiter a.k.a. Craig Benzine dancing

One of my daughter’s friends came over, and upon seeing my home office said, “Whoa! Your dad has a secret lab!” Well, the name stuck. It’s a Secret Lab now. But I felt like it needed a sign. Few things say “secret lab” to me better than Aperture Science, and since a lot of my work involves testing, I put together a 24″x36″ Testing Chamber poster to frame outside the entrance.

Want one of your own? Here’s my PSD file you can download/customize.

Portal-Poster


Ok, if you’re reading this, I’m assuming you know what CORS means, so I won’t tell you that it stands for Cross Origin Resource Sharing. Or maybe I just told you.

Anyway, you want to enable it on your Apache server. Maybe, like me, you’re building an API-based web app. So you need some JavaScript to pull data from a remote server. (Or even, like in my case, a different subdomain on the same physical server.) It’s easy in Node.js, so it shouldn’t be hard in Apache.

So you google “apache enable cors”. The first result is from enable-cors.org. Wow, how relevant! Sounds so legit! And it says all you have to do is throw this somewhere:

Header set Access-Control-Allow-Origin "*"

So you put it in your httpd.conf file or .htaccess and boom done.

GOIN HOME EARLY TONIGHT!

Except then you try it. And Firebug is all like: Cross-Origin Request Blocked: The Same Origin Policy disallows reading the remote resource at https://buckle.up.because.thisll.suck.org. This can be fixed by moving the resource to the same domain or enabling CORS.

And Chrome says: XMLHttpRequest cannot load https://howdare.youthink.thiswouldbe.easy. No ‘Access-Control-Allow-Origin’ header is present on the requested resource. Origin ‘https://pain.and.suffering.org’ is therefore not allowed access.

But… you did it right. You did just what it said you should do. You even googled it a few more times and everyone says the same thing—Just that one line of code and you’re supposed to be done! You’re supposed to be kicking back with some nachos now! Chrome even says that the header is there, for crying out loud!

Screenshot from Chrome


Yeah, no.

Disappointed face
Turns out there’s a friggin metric crapton more to it than that. I won’t go into all the details here, but there’s a lot. What I will do is give you a list of quick and dirty things to try.

Enable mod_headers

There’s a module that allows Apache to add things to the request/response headers. You’ll need that. Near the top-ish of your httpd.conf file, look for…

#LoadModule headers_module modules/mod_headers.so

(Mine was on line 115 in my Apache 2.4 setup.)

If yours has that hash/number/octothorpe/# sign at the beginning, remove it. As with any change to httpd.conf, you’ll need to restart Apache for this to take effect.

“Always”

First, just putting that line in my .htaccess wasn’t working. I could see the header in Chrome (image above) but it was apparently being ignored for who-the-crap-knows-why. Adding “always” before “set” seemed to correct this. I also moved it from my .htaccess to httpd.conf, just above my virtual hosts section.

Header always set Access-Control-Allow-Origin "*"

You’ll also see different versions of this out there in the wild, some where it says to use header set, and others where it says header add. Both will work, but set is safer in this case because add can add multiple headers, which according to the CORS documentation is not allowed.

Depending on your situation, that might do it for you. But probably not. So…

Other headers

Try adding these three:

Header always set Access-Control-Max-Age "1000"
Header always set Access-Control-Allow-Headers "X-Requested-With, Content-Type, Origin, Authorization, Accept, Client-Security-Token, Accept-Encoding"
Header always set Access-Control-Allow-Methods "POST, GET, OPTIONS, DELETE, PUT"

The 2nd one determines what headers your requesting server (the one trying to make the remote call) is allowed to send. You likely don’t need all of those, but I left in a bunch for the sake of example.

The 3rd one is super important. It determines what kind of RESTful calls your app is allowed to make. Again, you probably don’t need all of them. In fact, if you’re only doing GET requests, that’s the only one you need. But if you want to POST, then you need OPTIONS, too. More on that below.

GET works, but POST doesn’t: welcome to “preflights”

I won’t go into details here, but I will say that POSTs are different than GETs beyond the obvious ways. One way being that with POST, browsers do what’s called a “preflight” check. Basically, it sends a request before your actual POST, checking to see if it’s allowed to do what it’s trying to.

This was very confusing at first, because my GET calls were working fine, but when I tried to do a POST call, Chrome: 1. showed it as an OPTIONS request; and 2. returned 404 (or 400 or 403 or 500). The heck?

What’s happening is likely that your server is trying to respond to that OPTIONS preflight as a normal page fetch. It’s literally trying to serve up a page. In my case, the URL in question was a PHP script that was expected POST data and wasn’t getting it, so it barfed up a 403 error.

Making PHP return 200 OK for preflights

I had to make a script called blank.php, which contained nothing but some ranty comments. Then, over in .htaccess, I added this:

RewriteEngine On                  
RewriteCond %{REQUEST_METHOD} OPTIONS 
RewriteRule ^(.*)$ blank.php [QSA,L]

What’s happening here is, whenever an OPTIONS request comes in (line 2), it redirects any-and-all of them to blank.php (line 3). Blank.php is, well, blank, so it returns an HTTP status of 200 OK. The browser then takes this as a successful attempt to discover what its OPTIONS are, learns from the other headers (Allow-Origin, Allow-Headers, Allow-Methods) that it’s allowed to do a POST, and then finally sends the real, actual, honest POST that you’ve been trying to get it to do this entire freakin’ time.

Hope that helped

Depending on your environment/needs, that might not be the end for you. If so, you have my sympathy. Either way, I hope this at least gets you a few steps closer.
Blog Pages