Surprisingly, Apple has actually made this pretty easy. This works for Yosemite and El Capitan, and I’m assuming future versions too.
Make sure you have the installer downloaded from the app store. It will delete itself after you use it, but you can download it again.
Format an 8 GB flash drive and plug the thing in. Leaving it named “Untitled” is easiest, but you can change it. Just make sure to change any instances of “Untitled” in the command line below.
For El Capitan, Bust our your Terminal, and copypaste this:
So when a new version of any OS comes out, I like to do a clean install. On Macs, this has usually been fairly easy, since HFS+ partitions are pretty flexible — they’ll let you add/remove/resize without a lot of hassle.
Until Yosemite.
In the past, I’ve made a new partition on my drive, installed the new OS X (like Mavericks), copied all my files from the old partition to the new one. Once I’m sure that all is fine and dandy, I will go back and delete the older partition and give the space to the new one.
But when I tried this with 10.10 Yosemite, I ran into a new problem. Partitions were no longer flexible. I couldn’t delete or resize any of them. I found this out after spending a full day getting the new Yosemite partition just right.
Some research found that Yosemite will change its partition from HFS+ to “Core Storage”. (According to Ars Technica, there’s not a clear reason why, either.) I’m not sure of all the technical details, but this apparently killed flexibility. So my new Yosemite install was stuck on a partition with only 10GB of free space, when it could have had 400 from the old Mavericks partition. It wouldn’t even let me delete the Mavericks partition. Everything was locked.
Fortunately, I found a solution. You can convert Yosemite’s Core Storage partition back to HFS+. Once I did that, Disk Utility worked fine again. Some notes:
This is not destructive. You won’t lose anything.
This only works if you have not encrypted the partition with FileVault.
Here’s how:
First, you have to get something called a lvUUID for the partition. (Don’t worry about the annoying acronym. This is all scarier than it looks.)
Open Terminal, and run this (you can copy/paste):
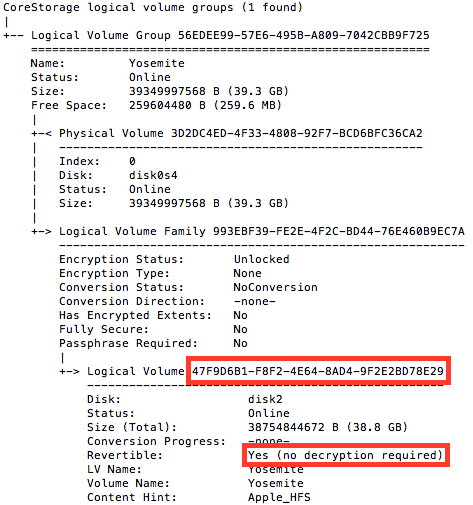
diskutil cs list
This will give you a list of partitions similar to this:
Thanks to BrettApple at the MacRumors forum for this.
Okay. See how it says “Revertible: Yes”? That means we can convert it back. You’ll need that super-long string of letters/numbers. In the same Terminal window, type:
diskutil coreStorage revert [THAT LONG STRING OF STUFF]
The results should be quick. Only seconds. Once that was finished, I was able to delete the Mavericks partition and resize my new Yosemite partition to fill all available space.