Problem: You try to clone/pull/push to a GitHub repo and you have 2FA enabled. It asks for your password, you give it, and you’re told “Invalud username or password” and/or “Authentication failed for your_reponame.”

root@f5bcc0000a:/# git clone https://github.com/awesometoast/professorcoolbread
Cloning into 'professorcoolbread'...
Username for 'https://github.com': awesometoast
Password for 'https://awesometoast@github.com':
remote: Invalid username or password.

Solution: You need to use a personal access token instead of your password.

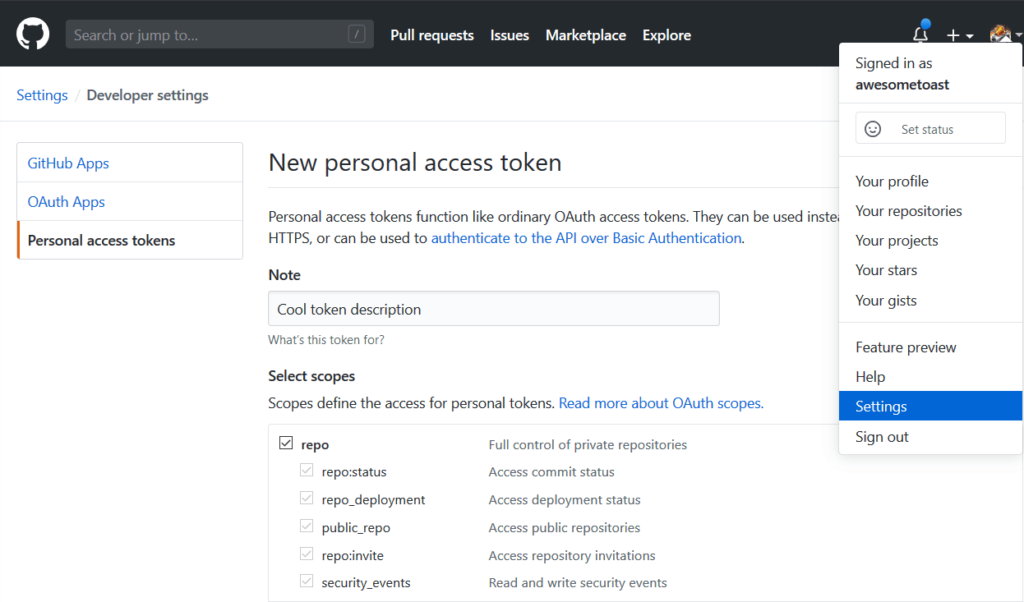
Make one by logging in to your GitHub account. Mash your avatar in the top right, then mash Settings. At the bottom of the sidebar on the left, you’ll see Developer Settings. Mash that.

Or you can just use this URL: https://github.com/settings/tokens

Hit Generate new token near the top of the page.

When you’re asked to “Select scopes”, click repo. You can add more if you need to, but this is the minimum.

Hit the green Generate token button at the bottom of the page. GitHub will hit you back with your new token.

Save that token somewhere secure. Next time you try to git from a command line, paste that token instead of your password. Don’t worry, you won’t need to do this every time.


Surprisingly, Apple has actually made this pretty easy. This works for Yosemite and El Capitan, and I’m assuming future versions too.

Make sure you have the installer downloaded from the app store. It will delete itself after you use it, but you can download it again.

Format an 8 GB flash drive and plug the thing in. Leaving it named “Untitled” is easiest, but you can change it. Just make sure to change any instances of “Untitled” in the command line below.

For El Capitan, Bust our your Terminal, and copypaste this:

sudo /Applications/Install\ OS\ X\ El\ Capitan.app/Contents/Resources/createinstallmedia --volume /Volumes/Untitled --applicationpath /Applications/Install\ OS\ X\ El\ Capitan.app --nointeraction

Pretty much the same for Yosemite:

sudo /Applications/Install\ OS\ X\ Yosemite.app/Contents/Resources/createinstallmedia --volume /Volumes/Untitled --applicationpath /Applications/Install\ OS\ X\ Yosemite.app --nointeraction

iTunes 11 is out, and most people seem to think it’s great. You and I are different, however. We hate it, and we have our reasons. (Mine happens to be the inability to skip tracks while Repeat One is on. Yup, deal-breaker for me. UPDATE: Fixed that!) So let’s make things right again.

First, you’ll need a backup of your iTunes Library.itl file, found under ~/Music/iTunes. Fortunately, I backed my library up right before installing iTunes 11. Note that any new songs, apps, etc. that you may have added since installing 11 will need to be replaced. In my case, I used the “Date Added” feature in iTunes to find which files I had added since November 28, and copied those out into a separate folder. When the downgrade was complete, I simply copied them back in.

Let’s get started:

1. Back up your iTunes Library.itl file, found under ~/Music/iTunes

2. Now you need an iTunes 10.7 dmg file. Download it from Apple here.

3. Delete iTunes 11. There are different ways to do this. One is to use an app called AppZapper. The method that worked for me was this: Open Terminal.app and run these commands, one at a time:

killall iTunes
killall "iTunes Helper"
sudo rm -rf /Applications/iTunes.app/

That last one will need your password and will probably take a minute or so.

4. Now we have to reinstall iTunes 10.7 using an app called Pacifist (shareware, free). Download Pacifist and run it. (Mavericks: download Pacifist from the link at the bottom of the post instead.)

5. Choose the Open Package option. Browse to the iTunes 10.7 dmg file.

6. You’ll get a list of files. Select “Contents of Install iTunes.pkg”, and from the top left corner of the app, choose Install.

7. Be careful here! Every time Pacifist tells you a file already exists, make sure you check the “always” box and choose Replace (not update). This should happen around three or four times.

8. You’re almost done. Before running iTunes again, make sure you have recovered your “iTunes Library.itl” from a pre-iTunes-11 backup. After that, you should be good to go. But as ever, your mileage may vary.

Mavericks (10.9) Update

I was dreading Mavericks because it automatically updates iTunes to 11, and this is frankly unacceptable for some. Thank goodness this method worked like a charm this morning! I had 10.7 back in about 5 minutes.

There was only one hiccup: Use this version of Pacifist (3.0.10)! For some reason, the latest version (3.2 as of this writing) would not install the package.

Also, if you just installed Mavericks, don’t open iTunes! If you do, it’ll update your iTunes library files, and you’ll have to restore your old ones from a backup after you install iTunes 10.7. But if you never open iTunes 11, they won’t be changed, and you won’t have to restore a thing.

*Mavericks Update #2

So it appears that after downgrading to iTunes 10.7, the Mac App Store may become borked in the process — apps will neither update nor download from it. I’m not sure if this is just because Mavericks is fresh and will get updated by Apple or what. I use the Mac App Store just about never, so I don’t really care, but you might! More details as they become available.

If you’ve already installed 10.7 and want the app store back, installing iTunes 11 again fixes the problem.

Recently, I installed Lubuntu 11.10 (a netbook-optimized version of Ubuntu) on my wife’s netbook at Lifehacker’s suggestion. And wow–did it make an incredible difference. It’s like a brand new machine compared to Windows 7 running on it, which was getting unbearably slow.

While Lubuntu will look and act pretty familiar to anyone born and raised on Windows, I wanted to make sure when I handed the netbook back to her, she was as comfortable as possible. That meant configuring, among other things, the power management. (Lubuntu wasn’t putting the machine to sleep when the lid was closed by default.)

First, I had to make the power manager run on startup. To do this, you go to:

Menu (think Start Menu) > System Tools > Desktop Session Settings.

Here, you’ll see a number of items. Power Manager should be pretty close to the top. Check the Enabled box, hit OK, then restart.

Now you’ll see a familiar battery icon in the system tray. Yay! Right-click on that to find its preferences, like how long until the computer sleeps, what happens when power buttons are pressed and when the lid is closed, etc.

Back to that missing icon…

Anyhow, during my experiments, I accidentally set the power manager’s system tray icon to “Never show icon”. And there was no link to it under the System Tools or Preferences Panel. How the heck was I supposed to get it back? After too much searching, I finally discovered you can run the settings panel from the command line. Open up the terminal (in Lubuntu it’s under Menu > Accessories > LXTerminal). Now type this in and mash enter:

xfce4-power-manager-settings

The settings panel will appear. Breathe sigh of relief and continue.

Update:

Commenter Marc shares how to make the power manager’s settings panel appear in the Menu (Start Menu-esque Thing).

If you want to find an entry in the menu, you’ll have to edit /usr/share/applications/xfce4-power-manager-settings.desktop. Change:

OnlyShowIn=XFCE;

to

OnlyShowIn=XFCE;LXDE;

Update: This works all the way up to 10.10 Yosemite.

Ever wanted to have some more organization on your dock? I like to keep things separated more or less by group: everyday things, development tools, and apps that just happen to be open but aren’t permanent fixtures on my dock. I also like to keep my documents and folders separated from minimized things and the trash on the right side.

A Mac dock containing spacers
A-like so

It’s fairly simple to drop some spacers into your dock. And yes, it uses Terminal, but don’t get squeamish. Just copy and paste the lines you see below. To add spacers to the left side, open up Terminal and paste this:

defaults write com.apple.dock persistent-apps -array-add '{tile-data={}; tile-type="spacer-tile";}'

Now mash Enter.

And now you’re wondering why nothing happened. We have to reset the dock to make the space appear. Now paste this:

killall Dock

And mash Enter again. Your dock will vanish and reappear with a space at the end of the left side. You can drag it around (or even off) just like any other icon. Repeat as desired for more spacers!

And for the right side…

Paste this, followed by the usual mashing of Enter afterwards.

defaults write com.apple.dock persistent-others -array-add '{tile-data={}; tile-type="spacer-tile";}'

Follow it up with the usual:

killall Dock

Now speak aloud the word “booyah” or other popular slang term designating success.

Note: I’ve confirmed this also works in OSX 10.7 Lion