Some call it “bridge” mode. The point is you want your TP-LINK to play nice with another router from which your internet actually flows. Like if you have a fiber/DSL/psychic router you can’t replace because ISP reasons but you want some wifi that doesn’t totally suck. For example.

The reason this can be confusing with the Archer series is that many other routers have a setting like “AP mode” that you turn on and you’re done. Or Their WAN (a.k.a “internet”) port can be used for this job. While it’s a nice piece of router, the Archer doesn’t make it clear how to do this. And you may be dealing with/swearing at messages like “WAN and LAN cannot be on the same subnet”.

Anyway, let’s kick this pig! (Translated: “Let’s do this.”) I’ll just start from the top. You can skip ahead if you’ve already done any/some of these.

1. Don’t connect it to your main router yet

Just plug it in and hit the On switch.

2. Log on to that mess

Connect your computer to it with an Ethernet cable, OR hop on one of its default SSIDs it will start broadcasting automagically. (TP-LINK-XXXX).

With that done, head on over to http://192.168.0.1. The default login is “admin” for both username and password. Change that later. Do it.

3. Completely ignore the rest of the quick installation guide

Woman tossing a quick start guide instead of a flower boquet
Toss that thing. Or save it for later. Whichever.

4. Set a static IP address

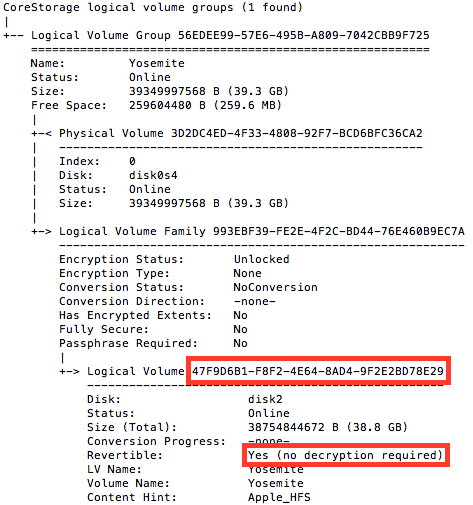
We need your TP-LINK to have a different IP than your internets-providing router, which may likely also be using 192.168.0.1. We don’t want them arguing with each other. This can be whatever you want, so long as it doesn’t conflict with anything else on your network. I usually go with 192.168.0.254.

Visual guide for what to do here.
Ignore “WAN” completely.

5. Disable DHCP

Your other router will be on DHCP duty, so the TP-LINK shouldn’t bother.

DHCP

6. Other stuff

Change the SSID names and turn on WPA2 security. And change the router login (under Settings > Password and not under Security like you’re very reasonably assuming).

7. Hook it up

Plug the Archer in to your main router, Ethernet-cable-style. Do NOT use the TP-LINK’s WAN port. Use any of the other four.

8. Dance

Because you’re done now.

Wheezy Waiter a.k.a. Craig Benzine dancing

Ok, if you’re reading this, I’m assuming you know what CORS means, so I won’t tell you that it stands for Cross Origin Resource Sharing. Or maybe I just told you.

Anyway, you want to enable it on your Apache server. Maybe, like me, you’re building an API-based web app. So you need some JavaScript to pull data from a remote server. (Or even, like in my case, a different subdomain on the same physical server.) It’s easy in Node.js, so it shouldn’t be hard in Apache.

So you google “apache enable cors”. The first result is from enable-cors.org. Wow, how relevant! Sounds so legit! And it says all you have to do is throw this somewhere:

Header set Access-Control-Allow-Origin "*"

So you put it in your httpd.conf file or .htaccess and boom done.

GOIN HOME EARLY TONIGHT!

Except then you try it. And Firebug is all like: Cross-Origin Request Blocked: The Same Origin Policy disallows reading the remote resource at https://buckle.up.because.thisll.suck.org. This can be fixed by moving the resource to the same domain or enabling CORS.

And Chrome says: XMLHttpRequest cannot load https://howdare.youthink.thiswouldbe.easy. No ‘Access-Control-Allow-Origin’ header is present on the requested resource. Origin ‘https://pain.and.suffering.org’ is therefore not allowed access.

But… you did it right. You did just what it said you should do. You even googled it a few more times and everyone says the same thing—Just that one line of code and you’re supposed to be done! You’re supposed to be kicking back with some nachos now! Chrome even says that the header is there, for crying out loud!

Screenshot from Chrome


Yeah, no.

Disappointed face
Turns out there’s a friggin metric crapton more to it than that. I won’t go into all the details here, but there’s a lot. What I will do is give you a list of quick and dirty things to try.

Enable mod_headers

There’s a module that allows Apache to add things to the request/response headers. You’ll need that. Near the top-ish of your httpd.conf file, look for…

#LoadModule headers_module modules/mod_headers.so

(Mine was on line 115 in my Apache 2.4 setup.)

If yours has that hash/number/octothorpe/# sign at the beginning, remove it. As with any change to httpd.conf, you’ll need to restart Apache for this to take effect.

“Always”

First, just putting that line in my .htaccess wasn’t working. I could see the header in Chrome (image above) but it was apparently being ignored for who-the-crap-knows-why. Adding “always” before “set” seemed to correct this. I also moved it from my .htaccess to httpd.conf, just above my virtual hosts section.

Header always set Access-Control-Allow-Origin "*"

You’ll also see different versions of this out there in the wild, some where it says to use header set, and others where it says header add. Both will work, but set is safer in this case because add can add multiple headers, which according to the CORS documentation is not allowed.

Depending on your situation, that might do it for you. But probably not. So…

Other headers

Try adding these three:

Header always set Access-Control-Max-Age "1000"
Header always set Access-Control-Allow-Headers "X-Requested-With, Content-Type, Origin, Authorization, Accept, Client-Security-Token, Accept-Encoding"
Header always set Access-Control-Allow-Methods "POST, GET, OPTIONS, DELETE, PUT"

The 2nd one determines what headers your requesting server (the one trying to make the remote call) is allowed to send. You likely don’t need all of those, but I left in a bunch for the sake of example.

The 3rd one is super important. It determines what kind of RESTful calls your app is allowed to make. Again, you probably don’t need all of them. In fact, if you’re only doing GET requests, that’s the only one you need. But if you want to POST, then you need OPTIONS, too. More on that below.

GET works, but POST doesn’t: welcome to “preflights”

I won’t go into details here, but I will say that POSTs are different than GETs beyond the obvious ways. One way being that with POST, browsers do what’s called a “preflight” check. Basically, it sends a request before your actual POST, checking to see if it’s allowed to do what it’s trying to.

This was very confusing at first, because my GET calls were working fine, but when I tried to do a POST call, Chrome: 1. showed it as an OPTIONS request; and 2. returned 404 (or 400 or 403 or 500). The heck?

What’s happening is likely that your server is trying to respond to that OPTIONS preflight as a normal page fetch. It’s literally trying to serve up a page. In my case, the URL in question was a PHP script that was expected POST data and wasn’t getting it, so it barfed up a 403 error.

Making PHP return 200 OK for preflights

I had to make a script called blank.php, which contained nothing but some ranty comments. Then, over in .htaccess, I added this:

RewriteEngine On                  
RewriteCond %{REQUEST_METHOD} OPTIONS 
RewriteRule ^(.*)$ blank.php [QSA,L]

What’s happening here is, whenever an OPTIONS request comes in (line 2), it redirects any-and-all of them to blank.php (line 3). Blank.php is, well, blank, so it returns an HTTP status of 200 OK. The browser then takes this as a successful attempt to discover what its OPTIONS are, learns from the other headers (Allow-Origin, Allow-Headers, Allow-Methods) that it’s allowed to do a POST, and then finally sends the real, actual, honest POST that you’ve been trying to get it to do this entire freakin’ time.

Hope that helped

Depending on your environment/needs, that might not be the end for you. If so, you have my sympathy. Either way, I hope this at least gets you a few steps closer.

os-x-yosemite

So when a new version of any OS comes out, I like to do a clean install. On Macs, this has usually been fairly easy, since HFS+ partitions are pretty flexible — they’ll let you add/remove/resize without a lot of hassle.

Until Yosemite.

In the past, I’ve made a new partition on my drive, installed the new OS X (like Mavericks), copied all my files from the old partition to the new one. Once I’m sure that all is fine and dandy, I will go back and delete the older partition and give the space to the new one.

But when I tried this with 10.10 Yosemite, I ran into a new problem. Partitions were no longer flexible. I couldn’t delete or resize any of them. I found this out after spending a full day getting the new Yosemite partition just right.

Some research found that Yosemite will change its partition from HFS+ to “Core Storage”. (According to Ars Technica, there’s not a clear reason why, either.) I’m not sure of all the technical details, but this apparently killed flexibility. So my new Yosemite install was stuck on a partition with only 10GB of free space, when it could have had 400 from the old Mavericks partition. It wouldn’t even let me delete the Mavericks partition. Everything was locked.

Fortunately, I found a solution. You can convert Yosemite’s Core Storage partition back to HFS+. Once I did that, Disk Utility worked fine again. Some notes:

  • This is not destructive. You won’t lose anything.
  • This only works if you have not encrypted the partition with FileVault.

Here’s how:

First, you have to get something called a lvUUID for the partition. (Don’t worry about the annoying acronym. This is all scarier than it looks.)

Open Terminal, and run this (you can copy/paste):

diskutil cs list

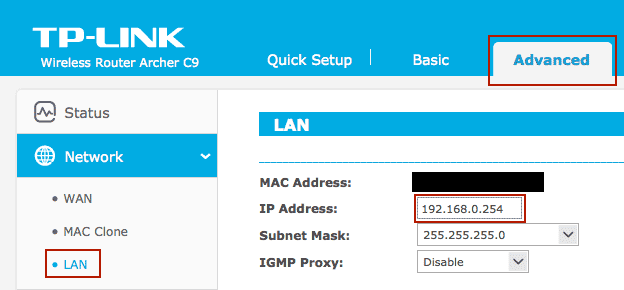
This will give you a list of partitions similar to this:

Results of diskutil cs list
Thanks to BrettApple at the MacRumors forum for this.

Okay. See how it says “Revertible: Yes”? That means we can convert it back. You’ll need that super-long string of letters/numbers. In the same Terminal window, type:

diskutil coreStorage revert [THAT LONG STRING OF STUFF]

So in this particular case, we would run:

diskutil coreStorage revert 47F9D6B1-F8F2-4E64-8AD4-9F2E2BD78E29

The results should be quick. Only seconds. Once that was finished, I was able to delete the Mavericks partition and resize my new Yosemite partition to fill all available space.

Some final notes:

  • For more details, check out this forum thread on MacRumors. In particular, post #38.
  • The first terminal command, diskutil cs list will only work if you actually have a CoreStorage partition.
  • You can run this while booted into the Yosemite partition in question. No need to boot the recovery partition or anything.
  • As I understand it, Apple’s Fusion Drives require Core Storage so this won’t work on those.


Windows batch files (.bat) can be scripted, which means you can do all sorts of things like setting variables. But if you’re having a hard time getting those variables to set, this might be why.

SET var=Holy crap, it sets the variable!

Will work fine, but…

SET var = Holy crap, the space screws it up!

… will not. If you’re used to putting spaces after equals signs like I am, you can make this mistake without even knowing it. If you do it wrong, it won’t throw any errors either. Just silently fails.


Warning: This post assumes you’re already familiar with IPN, and you’re just having trouble, well, troubleshooting it.

Okay, let’s say you’re setting yourself up with PayPal IPN. You’ve set up a PHP listener not unlike this one. You’re all set, right? Ready to test it out with PayPay’s IPN Simulator! Yeah!

Except it fails. It always fails. Why?

To try and figure it out, I set up a file named paypal.txt and told my listener to write the results to that file. Like so:

// These two lines are just landmarks so you can see where I am:
while (!feof($fp)) {
   $response = fgets ($fp, 1024);

   // Here's the actual logging code:
   $file = 'paypal.txt';
   $current = file_get_contents($file);
   $current .= PHP_EOL."DAMN !fp";
   file_put_contents($file, $current);

Okay? And after hours of troubleshooting, this is the only thing I would get:

HTTP/1.0 400 Bad Request
Server: BigIP
Connection: close
Content-Length: 19

Invalid Host header

Nice, huh? Super helpful. Well, as it turns out, the problem is that the example code I linked to above, and variations of it I’ve found all over the webs only work for live IPN responses. Meaning anything from www.sandbox.paypal.com (like PayPal itself tells you to use) will fail. EVEN IF YOU CHANGED IT to use Sandbox like so: (This is line 15 of the above-linked example code)

$fp = fsockopen ('ssl://www.sandbox.paypal.com', 443, $errno, $errstr, 30);

The problem

As near as I can tell, the problem is that the IPN responses are being sent from paypal.com, even though you want</> to — have been told by PayPal itself — to work with sandbox.paypal.com while developing.

The fix

Here it is. See line 2.

$header = "POST /cgi-bin/webscr HTTP/1.0\r\n";
$header .= "Host: www.sandbox.paypal.com\r\n";
$header .= "Content-Type: application/x-www-form-urlencoded\r\n";
$header .= "Content-Length: " . strlen($postback) . "\r\n\r\n";

Done. Problem should be solved. To sum up, it’s not enough simply to set the fsockopen() to use sandbox.paypal.com, you also need to set the response header correctly, or there will be a mismatch and sad, sad failure.

Hope this helps!


So you want to do something on a mapped network drive using PHP, but it simply tells you it couldn’t find the drive? Worry not.

What’s going wrong?

The problem is that PHP runs under the SYSTEM account, and the SYSTEM account can’t access mapped drives.

The solution:

So, we need to map the drive from the SYSTEM account. You can do this from your PHP script, but if you need persistent access, we can do this:

1. Download the Windows Sysinternals Suite and unzip it somewhere you can easily get to from a command prompt.

2. Open an elevated command prompt. (Search for “cmd.exe” from the Start ball, and then right-click on it, and choose Run as Administrator.)

3. Using the command prompt, navigate to wherever you put Sysinternals.

4. Elevate yourself once again to supreme power by using:

psexec -i -s cmd.exe

A new command prompt window will open that is running as the SYSTEM account.

5. Map the network drive:

net use z: \\[IP ADDRESS HERE]\[FOLDER NAME HERE] /persistent:yes

And you’re done!

Warnings:

You can only remove this mapping the same way you created it, from the SYSTEM account. If you need to remove it, follow steps 1 -4 but change the command on step 5 to: net use z: /delete.

The newly created mapped drive will now appear for ALL users of this system but they will see it displayed as “Disconnected Network Drive (W:)”. Don’t worry though! It displays as disconnected, but will work for any user.


iStock_000003225418XSmall

And FROM_UNIXTIME(), too!

Maybe you’re like me, and you’re migrating something from MySQL over to PostgreSQL. Maybe, like me, you’re swearing a great deal and experiencing high blood pressure, too.
(Or maybe not.)

I’ve seen numerous threads that just tell you how you can change all your code to use Postgres’s epoch_something_something_aint_nobody_got_time_fo_dat() function instead, but epic hero Janusz Slota has a better way. He shows you how to, rather easily, make it possible to run those functions in PG without having to change a thing.

Check out his solution right on over here.

(Just change LANGUAGE ‘SQL’ to LANGUAGE ‘sql’ if you’re using PG 9.2+)


Skipping tracks with repeat on? Preposterous!In iTunes 10, you could skip to the next/previous track when Repeat One was turned on. In 11 & 12, they assume that by “skip ahead”, you somehow mean “rewind this track”.

This really bothers some people.
Do not judge us, we have our reasons!

And here’s one way to fix it.

It took some work, but I finally came up with some AppleScript to handle this. Basically, we’re checking to see if Repeat One is on. If it is, we quickly disable it, skip to the next (or previous) track, and then turn it back on. Apple borked the old way of doing this (same with shuffle), so we’re using menu bar items instead.

-- This script lets you skip songs in iTunes 11/12 even if repeat one is on

tell application "System Events"
	tell process "iTunes"

		-- Find out if repeat one is on
		-- This finds out if the menu item is checked
		set isRepeatOneOn to (value of attribute "AXMenuItemMarkChar" of menu item 3 of menu 1 of menu item "Repeat" of menu 1 of menu bar item "Controls" of menu bar 1 as string) ≠ ""

		if isRepeatOneOn is true then

			-- Set repeat to ALL
			click menu item 2 of menu 1 of menu item "Repeat" of menu 1 of menu bar item "Controls" of menu bar 1

			-- Skip to previous track...
			click menu item "Previous" of menu 1 of menu bar item "Controls" of menu bar 1

			-- Need this, or the next step happens too fast
			delay 0.1

			-- Reactivate Repeat One
			click menu item 3 of menu 1 of menu item "Repeat" of menu 1 of menu bar item "Controls" of menu bar 1

		else
			-- Just skip to previous track
			click menu item "Previous" of menu 1 of menu bar item "Controls" of menu bar 1
		end if

	end tell
end tell

You can copy/paste that, or you can just download the script files here.
There’s one script for skip ahead, and one for skip back.

Wait—how do I use these?

Valid question. They’re not all that useful, really—unless you assign them to hotkeys.

Head on over here to Mac OS X Tips for ways and examples to set hotkeys to run AppleScripts.

Personally, I used Quicksilver to control iTunes for years, but now I use Alfred 2 (with Powerpack.)

(Since it’s not super obvious, let me know in the comments if you’d like help setting up either of these scripts using Alfred 2.)


iTunes 11 is out, and most people seem to think it’s great. You and I are different, however. We hate it, and we have our reasons. (Mine happens to be the inability to skip tracks while Repeat One is on. Yup, deal-breaker for me. UPDATE: Fixed that!) So let’s make things right again.

First, you’ll need a backup of your iTunes Library.itl file, found under ~/Music/iTunes. Fortunately, I backed my library up right before installing iTunes 11. Note that any new songs, apps, etc. that you may have added since installing 11 will need to be replaced. In my case, I used the “Date Added” feature in iTunes to find which files I had added since November 28, and copied those out into a separate folder. When the downgrade was complete, I simply copied them back in.

Let’s get started:

1. Back up your iTunes Library.itl file, found under ~/Music/iTunes

2. Now you need an iTunes 10.7 dmg file. Download it from Apple here.

3. Delete iTunes 11. There are different ways to do this. One is to use an app called AppZapper. The method that worked for me was this: Open Terminal.app and run these commands, one at a time:

killall iTunes
killall "iTunes Helper"
sudo rm -rf /Applications/iTunes.app/

That last one will need your password and will probably take a minute or so.

4. Now we have to reinstall iTunes 10.7 using an app called Pacifist (shareware, free). Download Pacifist and run it. (Mavericks: download Pacifist from the link at the bottom of the post instead.)

5. Choose the Open Package option. Browse to the iTunes 10.7 dmg file.

6. You’ll get a list of files. Select “Contents of Install iTunes.pkg”, and from the top left corner of the app, choose Install.

7. Be careful here! Every time Pacifist tells you a file already exists, make sure you check the “always” box and choose Replace (not update). This should happen around three or four times.

8. You’re almost done. Before running iTunes again, make sure you have recovered your “iTunes Library.itl” from a pre-iTunes-11 backup. After that, you should be good to go. But as ever, your mileage may vary.

Mavericks (10.9) Update

I was dreading Mavericks because it automatically updates iTunes to 11, and this is frankly unacceptable for some. Thank goodness this method worked like a charm this morning! I had 10.7 back in about 5 minutes.

There was only one hiccup: Use this version of Pacifist (3.0.10)! For some reason, the latest version (3.2 as of this writing) would not install the package.

Also, if you just installed Mavericks, don’t open iTunes! If you do, it’ll update your iTunes library files, and you’ll have to restore your old ones from a backup after you install iTunes 10.7. But if you never open iTunes 11, they won’t be changed, and you won’t have to restore a thing.

*Mavericks Update #2

So it appears that after downgrading to iTunes 10.7, the Mac App Store may become borked in the process — apps will neither update nor download from it. I’m not sure if this is just because Mavericks is fresh and will get updated by Apple or what. I use the Mac App Store just about never, so I don’t really care, but you might! More details as they become available.

If you’ve already installed 10.7 and want the app store back, installing iTunes 11 again fixes the problem.


The Actiontec GT784WN is a pretty nice DSL modem/wireless N router. For most of you, it will work right out of the box — even auto-detecting all your settings.

If you’re on Qwest/CenturyLink, not so much. In fact, they’ll try to tell you that the modem isn’t even compatible. That isn’t quite true — it is compatible, it simply isn’t supported, meaning their customer service has no training for this model. And that’s okay!

But you got your Actiontec and you want Internets. Well, we may be able to help you with that! I’m going to repeat some of the normal setup steps here. If you know what you’re doing, skip to #7.

  1. Just do like the Quick Start Guide says, plug it into the phone line, then into the wall, then wait for the DSL light to turn solid.
  2. Connect to it via the Ethernet cable and use your browser to head on over to http://192.168.0.1.
  3. Skip the Quick Setup and hit the Advanced Setup link. Now find WAN IP Settings on the left.
  4. Set the ISP Protocol to PPPoE.
  5. Under #3, enter your Qwest/CenturyLink username and password. (The username will be some kind of email address. I got these directly from Qwest when I signed up.)
  6. Mash Apply at the bottom of the screen.
  7. Now, find Broadband Settings on the left menu. It can be easy to pass up because it looks like a section heading more than a link.
  8. This part is a little tricky. It changes depending on region. If you used to be in the Qwest service area before CenturyLink merged with them, set VCI to 32. If you used to be Embarq, try VPI 0, VCI = 32. If you used to be CenturyTel, try VPI = 0VCI = 35.

UPDATE: When I originally posted this, it was for the Qwest service area. CenturyLink has merged with a lot of companies since then, and other smaller areas may have different connection settings. So these settings may not apply to you!

Your mileage may vary! And good luck.

(Thanks, commenter Curtis for the regional settings update.)

IF YOU LIVE IN FLORIDA: Commenter Just Joe has supplied the settings for your area. Go to the comment. Thanks, Just Joe.


Blog Pages