

So when a new version of any OS comes out, I like to do a clean install. On Macs, this has usually been fairly easy, since HFS+ partitions are pretty flexible — they’ll let you add/remove/resize without a lot of hassle.
Until Yosemite.
In the past, I’ve made a new partition on my drive, installed the new OS X (like Mavericks), copied all my files from the old partition to the new one. Once I’m sure that all is fine and dandy, I will go back and delete the older partition and give the space to the new one.
But when I tried this with 10.10 Yosemite, I ran into a new problem. Partitions were no longer flexible. I couldn’t delete or resize any of them. I found this out after spending a full day getting the new Yosemite partition just right.
Some research found that Yosemite will change its partition from HFS+ to “Core Storage”. (According to Ars Technica, there’s not a clear reason why, either.) I’m not sure of all the technical details, but this apparently killed flexibility. So my new Yosemite install was stuck on a partition with only 10GB of free space, when it could have had 400 from the old Mavericks partition. It wouldn’t even let me delete the Mavericks partition. Everything was locked.
Fortunately, I found a solution. You can convert Yosemite’s Core Storage partition back to HFS+. Once I did that, Disk Utility worked fine again. Some notes:
- This is not destructive. You won’t lose anything.
- This only works if you have not encrypted the partition with FileVault.
Here’s how:
First, you have to get something called a lvUUID for the partition. (Don’t worry about the annoying acronym. This is all scarier than it looks.)
Open Terminal, and run this (you can copy/paste):
diskutil cs list
This will give you a list of partitions similar to this:
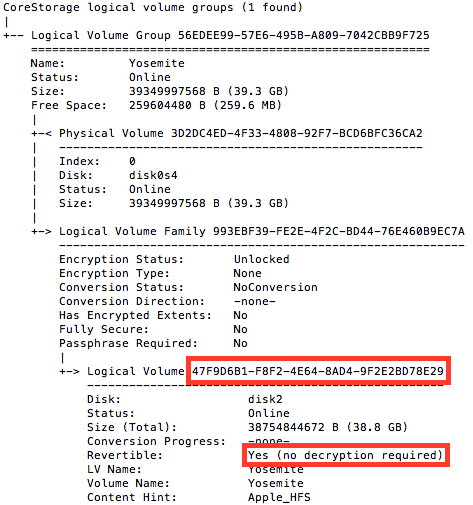
Okay. See how it says “Revertible: Yes”? That means we can convert it back. You’ll need that super-long string of letters/numbers. In the same Terminal window, type:
diskutil coreStorage revert [THAT LONG STRING OF STUFF]
So in this particular case, we would run:
diskutil coreStorage revert 47F9D6B1-F8F2-4E64-8AD4-9F2E2BD78E29
The results should be quick. Only seconds. Once that was finished, I was able to delete the Mavericks partition and resize my new Yosemite partition to fill all available space.
Some final notes:
- For more details, check out this forum thread on MacRumors. In particular, post #38.
- The first terminal command, diskutil cs list will only work if you actually have a CoreStorage partition.
- You can run this while booted into the Yosemite partition in question. No need to boot the recovery partition or anything.
- As I understand it, Apple’s Fusion Drives require Core Storage so this won’t work on those.

75 replies
Did not work for me, it was revertible. Ran the above command line and selecting Macintosh HD shows “you may only merge this partition with the one before it. To do this, click -” The Yosemite partition shows it can be deleted. The structure now is Yosemite HD “core storage logical volume. Under that Yosemite HD as the startup disk, Macintosh HD as a mounted partition and greyed out Yosemite HD as an unmounted partition. Any ideas? Why do I now have the third greyed out Yosemite HD unmounted partition?
So your Yosemite partition is the SECOND one, correct? In that case (sigh), what I had to do was clone the 2nd partition to the 1st, then delete the 2nd and expand the 1st to fill the whole drive. Talk about convolution. But it worked. In Disk Utility, you do this by selecting a partition, clicking the Restore tab (on the right, or main panel), then you drag the source and destination partitions to the right places. For 320 GB, this took about 2 hours.
Hi Aaron, I also worked that out and yes astoundingly convoluted, but it worked. Yosemite was the second partition and could only be “shrunk” The first partition could also be shrunk, but the space via Disk Utility is not available to the second partition.
The way I did it.
In disk utility I tried to restore from the second to the (now erased) first partition, but it said it could not be restored and to restart in repair mode. So I restarted with the Option key held, then ended up in disk utility, then was able to restore from the second to first partition. Source was the second and dragged the first from top left to the destination. 3 hours on a 2011 MBP for about 230GB.
Then erased the second partition and dragged the first to get back all the disk space.
In hindsight (wonderful thing) due to really liking Yosemite and the way the MBP ran compared to Mavericks installed over Mountain Lion, I would do a Time Machine backup, create a USB bootable drive and clean install that way. I may even do that to go back to core storage, as Apple intended, but do not know why there was a change or if it makes a difference to performance.
Many thanks.
Richard
I meant recovery mode. There were two Yosemite recovery options, so I used the one on the far right presuming that would be the second partition.
Thank you very much.
Afterwards, do we then need to revert back to coreStorage?
Thanks.
No need to revert. Fortunately.
Brilliant. Thank you. Worked perfectly. Definitely not ready to go to Yosemite yet. Not sure if I ever will be…
This process will need to be repeated after every Yosemite upgrade?
Only when installing Yosemite to a secondary partition on the drive, and then wanting to make it the primary partition.
Had I, for example, just upgraded from Mavericks to Yosemite (a.k.a. the normal way) without any of these partition shenanigans, none of this would be necessary. There are reasons to do different partitions, but the point is, no. This will not be necessary all the time.
Disk Warrior can no longer be booted from the DVD unless the Core Storage is destroyed. This command — diskutil cs revert disk1 — reverts the primary drive to “normal.” I’ve never experienced any of the issues that Core Storage is supposed to prevent, so right now this upgrade has created more issues than it has solved.
after doing as you instructed it says
“Passphrase:….”
what to fill in??
yes, it works for me and solved same problem
I don’t really have experience with terminal, but I think in my case the yosemite HD is the first one. I can see the name is Yosemite HD, and it has 50 GB, and the other is 198 GB. If this is correct, it says that it is not revertible. What can I do now?
here is a screenshot of terminal:
https://www.dropbox.com/s/6r023yajcf73q4s/Screen%20Shot%202014-11-20%20at%2010.50.17%20AM.png?dl=0
Thank you so much! Worked perfectly. Had to make sure to shut down terminal as well as disk utility before being able to erase the partition, but that was the only thing I stumbled on. Much appreciated!
IT WORKED FOR ME… THANK GOD.
sorry for caps but, i was getting really annoyed.
Excellent write up and instructions, i can’t thank you enough.
This worked perfectly for me. I had setup a partition to test the beta version of Yosemite and needed to revert back to a single partition. I was working on a computer that was new and I didn’t have anything that needed to be preserved though. So I didn’t care if it erased the entire drive. I was able to repartition after running this terminal command. Thanks for sharing this solution!
Super !!!
I did it, then restart, and so my OSX partition can be drag to resize it.
Thank you so much.
so i tried this, i’ve reverted everything successfully, but i still cant get my disk to take up almost like 300 GB of free space, its still grayed out. its not telling me anything, and im about to do the restarty thing to get into disk utility that way, but i figured i’d post a screenshot first and hope it works, if you’re wondering why i have a partition thats less than half the size of the total disk space, i have no clue, when a friend gave me this he explained it as a “OS change fail”, almost a whole year ago.
here’s the screenshot of disk utility http://imgur.com/u6DOPZS
oh, and if you click on the actual partition, the disk space field is grayed out, im not completely incompetent, just didnt have that clicked in that pick, here’s one with it clicked. http://imgur.com/dNNUDlS
Thanks helped me out after a long process of getting windows as a second boot. 🙂
Halefrickinluja! You ended my nightmare!
Hi, I turned Filevault off, restarted & typed diskutil cs list into Terminal. The reply was: No CoreStorage logical volume groups found
So I’m stuck!
I am getting similar issue to graham, no corestorage logical volume groups found.
Have never had filevault on though so had no need to turn that off, never been able to resize macintosh hd yosemite partition to smaller size. Do have bootcamp partition though and wonder if Graham also had this.
Thank you very much for this post, I’ve been scratching my head for a couple of days now, with a lot of destructive solutions proposed to getting the file system back the way it was. I was very close to re-installing OSX when I found this.
How is anyone supposed to know that this is what a Yosemite “upgrade” does? I feel betrayed…. Why do I need virtual volumes when I have less than 4 partitions? Other OSes play much nicer than this in my opinion. Would’ve been nice to know what was going on beforehand before I lost work time trying to figure out what was going on.
Thanks again you really are awesome toast 🙂
I seriously love you. Thank you!!
Worked for me, thanks a lot!
It’s not in the man page for diskutil, but ‘diskutil cs resizevolume’ is available to resize core storage LV’s directly. It’ll work on encrypted volumes as well.
Worked like a charm!
Saved me a lot of time from backing up, completely reformatting the drive and restoring the backup.
This worked perfectly! Thank you!!!!!!!!!!!!!!
hey i was so excited same probs my partition where i stuck yosemite to trial still shows up won’t delete – did all the suggestion but guess what my terminal didn’t show revertible yes – ONLY NO. Oh well
I am trying to erase my disk, disk utility grayed out, can’t use it, restarting in safe mode or command R, used commands in terminal but the disk won’t unmount, and the command here didn’t work “Syllables-MacBook:Terminal.app mymac$ diskutil cs list
No CoreStorage logical volume groups found” Help?
and i really dislike yosemite updates kill the efficiency of the OS in many ways. Why is it so hard to erase the disk? My cd drive doesn’t even work even if i had the original install disk to boot from
Thank you, thank you, thank you very much! I was that close to return my new MacBookPro I bought yesterday.
I am not sure I am out of the woods yet. I need total of 3 partitions. One for Windows and one for data used by Windows and Mac. I have to have that because I have a Linux VM in Windows.
I have not sleep for 36 hours trying to port my older MBP15 to this new machine and stuck with the partitioning nightware.
Thank you again!
Just GREAT. Worked immmediately, got my free space back. THANKS!!!
Thank you very much! 🙂 this is awesome appreciated!
Did you have PGP installed on your drive first before running the command?
Any idea WTF this means and the workround?
Error: -69741: The target disk isn’t eligible for reversion because it wasn’t created by conversion or it is not part of a simple setup of exactly one logical and one physical volume
Thanks, you save my day!
This walkthrough worked like a charm and saved me a bunch of time. Glad Google has placed you at the top of the search list for “yosemite resize partition”. Much thanks!
Worked for me! Was able to create new partition to install Mavericks on it!
hello
I have mac yasomite 10.13 I guess or something
i used bootcamp to install windows 7 64-bit ultimate with a mac HD 300 GB and a Windows of 200 GB (C=45 and m=155 or somthing)
when i install bootcamp for windows , windows crashes
and mac HD Is gone from booting view (what shows up after holding option button on startup)
any solution to restore Mac Just Fine (I Think it doesn’t like windows or something)
any way to burn a Mac yasomite iso to flash and reinstall Mac without destructive methods?
any Help? 😀
thanks in advance
best regards
Excellent! it worked!
OMG It worked like a charm. Thanks sooo much for putting up this post.
I got the error “Error: A disk with a mount point is required”
Yosemite 10.10.3
I also have “Paragon HFS+ for Windows10” on Windows 8.1 Bootcamp, still can’t see the Mac partition.
But I can see windows partition ONLY after installing Paragon NTFS for Mac 12.
I upgraded to Yosemite from Mavericks.
Here is my disk run.
As you can see says: Revertible: no.
drive isn’t encrypted.
Encryption Status: Unlocked
Encryption Type: None
Conversion Status: NoConversion
Conversion Direction: -none-
Has Encrypted Extents: No
Fully Secure: No
Passphrase Required: No
|
+-> Logical Volume 88F06CEE-1430-4D56-B7CF-7877E0319A47
—————————————————
Disk: disk1
Status: Online
Size (Total): 2689000013824 B (2.7 TB)
Conversion Progress: -none-
Revertible: No
LV Name: Macintosh HD
Volume Name: Macintosh HD
Content Hint: Apple_HFS
Thanks from Spain! Very easy one time i put commands!
Aaron, thanks a 1000 times!!!
I really wonder why Apple “enhanced” their storage system that way :/
I have the same issue as daveb, (#46, three quotes above) — I also have “Revertible: No” as the current status. Any way to get this fixed/changed? This is a 27″ iMac / Late 2012, with a Fusion drive. No BootCamp and no Paragon software.
Thanks! It worked perfectly. I used it so as to be able to rely on Clonezilla again for preparing MacBooks.
[…] Fusion Drive feature on a server which usually has more than one hard drive.) Thankfully, I found a way to convert the Core Storage volume back to a plain old HFS+ partition. Note that this method only works if the Core Storage volume is not […]
Bro, thank you very very much!!!!!!
WORKS PERFECT.
PS: UUID (volume name) is CASE SENSITIVE put the leters with CAPS
Hi and first thank you! I’m trying to install Windows XP on Yosemite and the only remaining obstacle left is that I can’t see the new partition (prepped, formatted Windows NT) in a alt or option restart. I can see it in disk utility *from the desktop*. I was wondering if you think that this fix could work in my case as well? I’m not very savvy so your tutorial will be the hardest yet but if I formatted a HD in Yosemite for windows wo Bootcamp I must be learning! Lol thank you!!
Wonderfull Man… Really Awesome…
Am I really out of luck if the diskutil cs list command indicates “no” for “revertible?” Is there no way around this?
I have the same issue as Jordan comment #56. I followed the advice of an “expert” and formatted two 3TB drives simultaneously, and both of them says they’re not revertable. I can use the somewhat undocumented coreStorage commands in terminal to delete the volumes, but nothing on the actual Logical Partition Group.
ANY help is appreciated.
U are AWESOME!
Worked perfectly for me.
Thanks a trillion times, I was beginning to lose my mind until I did this…u rock!
Brilliant! Thank you.
Thanks !
This is resolve my problem
But now everytime I launch Disk Utilities it is bugging me to “Fix” the Fusion drive which wrecks the existing partitions. Grrr…
I did it an work. But, i tried to install WINDOWS after, and could not. Now, I have this comment “No CoreStorage logical volume groups found”. Guys, do you know how to fix it? TANX
thanks!
work for me..
(suksma)
HI I AM HAVING THE SAME PROBLEM AS DAVE B HOW DO YOU MAKE Revertible: NO TO Revertible: Yes”
Just want to say thank you so much! you are a saint. 😀
Oh! And just wanted to add a final step for anyone if it “doesn’t appear to work” straight away: Don’t forget to restart your computer. 😉
THANK YOU!!! This fixed my Clonezilla issue with Yosemite!!!
Been searching and searching but this article solved my problem!! Thank you so much!!!!
[…] run into a problem at this step or whenever you try to resize a partition under Yosemite, check out this blog post and follow the instructions there to revert from Core Storage to a regular partition […]
Thanks a lot! It worked perfectly.
[…] diskutil cs revert on the Logical Volume which should be marked as Revertible in diskutil cs list […]
[…] followed this guide to convert my Core Storage partition to HFS+ in order to make my OS X partition visible in […]
I just used this little trick to erase a TimeMachine ptiritaon that wouldn’t accept the encryption password anymore. Yes, I had the right password, had used it before and stored it in KeyChain and 1Password. The other (non-encrypted) ptiritaon on the same physical disk was left untouched and unharmed. The only damage seems to be the loss of my TimeMachine backups, a lesser problem since I have multiple non-TM backups as well.What is the point of FileVaulting your startup disk if the backup is NOT encrypted as well?Now, why should this happen in the first place?So, a million thanks to people smarter and more knowledgeable than myself!
well done mate… worked perfect
It worked for me.
Now what is the command i have to use to revert back to coreStorage? I want to reinstall the OS using recovery tools, but now the disk cannot be selected to do so.
This worked perfectly for a client’s machine – thanks for the post!